
Operating instructions


Page 3
P/N XG0652
M38DV-PFC Conversion Kit
Gas Conversion Instructions
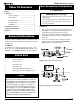
Power Pile
Igniter
Thermocouple
Pilot Hood
Pilot Orifice
Pilot Tube
Figure 3. The Pilot assembly. Unscrew the pilot tubing carefully to
access the pilot orifice.
Pilot Assembly:
7. While you have the rear burner removed, carefully unscrew
the pilot tubing and remove the pilot orifice. Replace it with the
new orifice supplied with this kit. Re-attach and tighten the pilot
tubing, taking care not to damage the tubing by overbending or
pinching it. (See figure 3.)
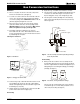
Figure 4.
Pilot orifices, showing identification markings.
The pilot orifice has a small marking on the side to indicate its
size and which gas it is for. Ensure that you install the correct
orifice in the pilot assembly. (See figure 4.)
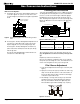
Figure 5. Main Burner.
Main Burner
10. Remove cover plate on both ends of the main (center) burner
and remove main burner tube. (See figure 5)
11. Loosen the set screws at each end of the burner tube. Slide the
sleeves out of each end of the tube and replace them with the
ones from the package marked 'Main Burner Sleeves' in this kit.
(See Inset, Figure 6.) Re-tighten the set screws.
12. Remove the orifices from the orifice holder at each end and
replace them with the new orifices from the package marked
'Main Burner Orifices' in this kit. (See Figure 6.) Make sure the
Orifices are tightened securely to prevent gas leaks.
13. Re-install the main burner, making sure you center the
burner between the two orifices. Ensure that the burner's flame
ports are pointed 90 degrees to the horizontal. Secure the burner
by re-attaching both cover plates.
Checking Your Conversion
14. Leak test using a soap solution with main burner turned on. Coat
pipe and tubing joints, gasket etc. with soap solution. Bubbles
indicate leaks. Tighten any areas where the bubbles appear until
the bubbling stops completely.
15. Light the fireplace pilot, and turn the gas control knob to the ON
position. Ensure all three burners light properly.
Re-Assembly
Figure 6. Changing main burner orifice.
Inset. Remove screw
to release sleeve.
16. Replace the logs, re-install the door and the door surround.
17. The label (part no. XL0201) indicating that the fireplace has been
converted for use with a different gas must be placed on the
fireplace rating plate over top of the existing fuel type chart.
18. The label (part no. XL0200) indicating
who converted the ap-
pliance must be filled out and placed on the base pan, directly
under the gas valve.