
Owner`s manual


Page 7
HWDF-Series Gas Fireplace
Part No. XG0190 - 071409
Installation
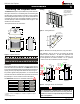
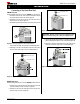
Figure 8a. Flue cap installation for Rear Vented replace.
Figure 8b. Flue collar installation for Rear Vented replace.
Important: Natural Gas and Propane equipped models
may be installed using Top or Rear Vent applications.
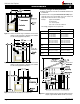
5” Inner Flue Cap
8” Outer Flue Cap
5” Inner Flue Collar
8” Outer Flue Collar
Figure 7b. Flue collar installation, Top Vented HW38DF replace.
5” Inner Flue Cap
8” Outer Flue Cap
5” Inner Flue Collar
8” Outer Flue Collar
Figure 8b. Flue collar installation, Rear Vented L38DF replace.
Converting to Top Vent/ Rear Vent
HW38DF Top Vent
Use the following instructions to convert a HW38DF, for Top Vent use:
1. Installthe5"inneruecapontherearueoutletandsecurethe
capinplacewithvescrews,asshowningure7a.
2. Installthe8"outeruecapontherearueoutlet,andsecureit
withvescrews,asshowningure7a.
3. Installtheuegasketmaterialanduecoverplateontherearvent
outlet . Fasten the plate with four screws, as illustrated below.
4. Installthe5"inneruecollarandthe8"outeruecollarinplace
on the top vent outlet using 5 screws, as illustrated below.
HW38DF Rear Vent
Use the following instructions to convert an HW38DF, for Rear Vent use:
1. Installthe5"inneruecaponthetopueoutletandsecurethe
capinplacewithvescrews,asshowningure8a.
2. Installthe8"outeruecaponthetopueoutlet,andsecureit
withvescrews,asshowningure8a.
3. Installtheuegasketmaterialanduecoverplateonthetopvent
outlet.Fastentheplatewithfourscrews,asillustratedingure8b.
4. Installthe5"inneruecollarandthe8"outeruecollarinplace
on the rear vent outlet using 5 screws, as illustrated below.