
Owner`s manual


Page 7
HT34-PV Series Power Vent Gas Fireplace
Part No. XG0530 - 041510
Installation
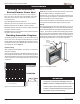
Converting to Top Vent/ Rear Vent
HT34-PV Top Vent
Use the following instructions to convert an HT34-PV for Top Vent use:
1. Install the 4" inner ue cap on the rear ue outlet and secure the
cap in place with ve screws, as shown in gure 7a.
2. Install the ue gasket material and ue cover plate on the rear vent
outlet . Fasten the plate with four screws, as illustrated below.
3. Install the 4" inner ue collar and the 7" outer ue collar in place
on the top vent outlet using 5 screws, as illustrated below.
Figure 7a. Flue cap installation for Top Vented replace.
Figure 7b. Flue collar installation for Top Vented replace.
Figure 8a. Flue cap installation for Rear Vented replace.
Figure 8b. Flue collar installation for Rear Vented replace.
4” Inner Flue Cap
7” Outer Flue Cap
HT34-PV Rear Vent
Use the following instructions to convert an HT34-PV for Top Vent use:
1. Install the 4" inner ue cap on the top ue outlet and secure the
cap in place with ve screws, as shown in gure 8a.
2. Install the 7" outer ue cap on the top ue outlet, and secure it
with ve screws, as shown in gure 8a.
4” Inner Flue Collar
7” Outer Flue Collar
4” Inner Flue Cap
7” Outer Flue Cap
4” Inner Flue Cap
7” Outer Flue Cap
4” Inner Flue Cap
7” Outer Flue Cap
7” Outer Flue Collar
4” Inner Flue Collar
3. Install the ue gasket material and ue cover plate on the top
vent outlet. Fasten the plate with four screws as illustrated in
Figure 8b.
4. Install the 4" inner ue collar and the 7" outer ue collar in
place on the rear vent outlet using ve screws as illustrated
below.