
Installation Guide


6
© 2013 Monte Carlo Fan Company
9/25/2013
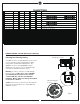
Warning: Before proceeding, be sure to shut off electricity
at main switch or circuit breaker in order to avoid electrical
shock.
Note: Before installing the wall transmitter, place it in OFF
position by pushing ON/OFF switch to the OFF.
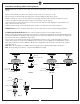
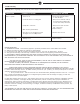
Make series-wound connection for the wall transmitter with
HOT wire from house. Connect a black wire from wall
transmitter to the HOT wire and then connect the other wire
of wall transmitter to the LOAD wire in outlet box (Follow the
instruction shown on the labels on the lead wires from wall
transmitter).
Connect green grounded wire to grounded wire from outlet
box.
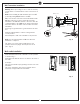
Install the wall transmitter to outlet box using machine
screws provided.
Attach wall plate to wall control unit with screws provided.
Note: Place the wall transmitter in ON mode when fan
installation is completed.
The switch cover can be replaced with almond cover
provided. Remove it by finger and snap the new one in
place. (Fig. 6)
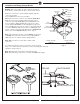
Wall Transmitter Installation
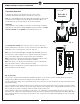
Wall cradle installation
Install Transmitter wall mount cradle with 2 screws provided
as shown in Fig. 7.
Install wall cradle with the direction as shown on back side of
the cradle.
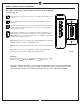
Useful tips:
Take remote transmitter up by pushing it at lower area of the
transmitter.
The remote transmitter can be held on magnetic metal
material by a magnet built in the transmitter.
Wall
Box
Hot to
AC source
To load
Ground
Wall plate
Switch cover
Wall transmitter
Back side of the
wall mount cradle
ON
OFF
Fig. 6
Fig. 7