
Installation Guide


GENERAL INSTALLATION
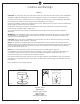
Before you begin installing the fan, Switch
power off at Service panel and lock
service disconnecting means to prevent
power from being switched on
accidentally. When the service
disconnecting means cannot be locked,
securely fasten a warning device, such
as a tag, to the service panel.
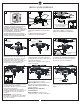
Remove set screws from switch housing.
Keep screws.
Switch housing may be different than
shown.
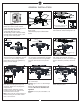
Unplug (If wiring with quick connectors)
and remove the switch housing from fan.
Remove tap from bottom of switch housing.
Thread lead wires from light fixture through
central hole in switch housing and then
install switch housing onto light fixture by
turning clockwise till tight.
Place lock washer and hex nut provided
over lead wires from light fixture and tighten
securely with the thread rod of light fixture.
Feed pull chain into the hole in pull chin
guide.
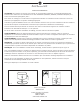
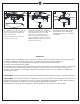
Connect white wire from light fixture
with white wire from fan and then
connect black (or blue) wire from light
fixture with blue (or black) wire from
fan.
If wiring with plugs, connect the plug
from fan to the plug from light kit
assembly. Make sure the plugs are
clasped firmly.
Install light kit assembly (switch
housing) onto the fan with the set
screws removed in step 2.
Note: There may be a light switch on
switch housing of some fans. Make
sure it is turned on.
Install 3 x 10-watt medium base enclosed
type of LED lamps.
Caution: Approved for use with LED light
bulb only
(MaxLiTe Model# E10A19DLED927/JA8,
dimmable). Do not use incandescent
light bulb.
Caution: Do not replace bulb until it cools
down.
Remove finial and final cap from light
fixture. Keep the parts.
ON
OFF
ON
OFF
Switch housing, plugs may be
different than shown
Switch
housing
Final cap
Finial
Bulb
Tap
Hex nut
Lock washer
Light fixture
Switch housing
Pull chain guide
Show different type
of wiring
3
© 2016 Monte Carlo Fan Company
12/2016
1
2 3
4
5
6
7 8
9