
Installation Sheet


2
© 2019 Monte Carlo Fan Company
7/2019
Wall Transmitter Installation, Wiring and Setting
Warning: Before proceeding, be sure to shut off electricity at main
switch or circuit breaker in order to avoid electrical shock.
Note: Before installing the wall transmitter, place it in OFF position by
pushing ON/OFF switch to the OFF. It is under the switch cover. (Fig.3)
Make series-wound connection for the wall transmitter with HOT wire
from house. Connect a black wire from wall transmitter to the HOT wire
and then connect the other wire to the LOAD wire in outlet box.
Note: The ON/OFF switch is to turn the power of fan on/off. If you
have installed a wall switch to control the power of fan, you may keep
the 2 black wires from the wall transmitter free and isolate them.
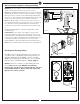
Connect green grounded wire to grounded wire from outlet box. (Fig.
1)
Install the wall transmitter to outlet box using machine screws
provided. (Fig. 2)
Install battery, remove switch cover by finger or using a small
pointed object and place batteries as shown in figure 3. Use a 12V,
23A/23AE batteries. The battery will weaken with age and should be
replaced before leaking as this will damage the transmitter. Dispose of
used battery properly, keep the battery out of reach for children.
Attach wall plate to wall control unit with screws provided. (Fig. 2)
Note: Place the wall transmitter in ON position when operating the fan.
Figure 2
White AC IN N
Green
120 VAC SUPPLY
Black To Hot
Black AC IN L
Black To Fan
Outlet Box
Figure 1
Black from fan (Receiver)
White from Fan (Receiver)
Green from
Wall
Transmitter
Receiver
Wall plate
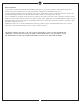
Dimming Non Dimming Setting
The “DIM” selection is the light dimmable selection and it is to be
used with incandescent light bulbs including halogen bulbs, and
dimmable LED luminaries. The “ON/OFF” selection is the light
ON/OFF only (non-dimming function) and it is to be used with CFL
bulbs and other non dimmable luminaries. (
Fig. 4, page 3
)
Warning: The remote controller is set with dimming function at
factory, make sure to select “ON/OFF” (non-dimming
function) when use this remote controller with CFL and other
non dimmable luminaries. Wrong setting may damage the
light kit or the remote controller.
Figure 3
Battery
Switch cover
+
-
Open end