
Installation Guide


2
© 2019 Monte Carlo Fan Company
7/2019
Wall Transmitter Installation, Wiring and Setting
Warning: Before proceeding, be sure to shut off electricity at main
switch or circuit breaker in order to avoid electrical shock.
Note: Before installing the wall transmitter, place the ON/OFF switch in
OFF position by pushing ON/OFF switch to the OFF.
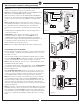
Make series-wound connection for the wall transmitter with HOT wire
from house. Connect a black wire from wall transmitter to the HOT wire
and then connect the other wire to the LOAD wire in outlet box from
fan.
Note: The ON/OFF switch is to turn the power of fan on/off. If you
have installed a wall switch to control the power of fan, you may keep
the 2 black wires from the wall transmitter free and isolate them.
Connect green grounded wire to grounded wire from outlet box. (Fig.
1)
Install the Bracket and Wall transmitter to outlet box using machine
screws provided. (Fig. 2)
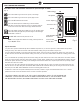
Install battery, remove switch cover by finger or using a small
pointed object and place batteries as shown in figure 3. Use 2
1.5V/AAA batteries. The battery will weaken with age and should be
replaced before leaking as this will damage the transmitter. Dispose of
used battery properly, keep the battery out of reach for children.
Infix the wall plate onto the bracket. (Fig. 2)
Note: Place the wall transmitter in ON position when operating the fan.
Universal Mode and Learning Mode
Remove wall plate and switch cover by finger or using a small pointed object
as shown in figure 3. If wall plate has been installed, remove it so as to pry
the switch cover open.
There are “Universal Mode” and “Learning Mode” with the remote controller.
If choosing “Universal Mode”, simply place both dip (code) switch at UPPER
position. Your fan with the remote controller is ready to use. (Fig. 3)
Note: If using universal mode, your fan can be controlled with other remote
transmitters with the same setting.
To control the fan with specific remote transmitter, choose “Learning Mode”
by placing the dip (code) switch at LOWER position and then make learn
function setting as below.
Make “Learn function setting”, Restore power source to your fan, press
and hold the “SET” button for about 4 seconds until buzzer inside receiver
sounds. Your remote controller is ready to operate the fan. You must press
the “SET” button within 1 minute of restoring power to the fan. (Fig.3)
Note: If the power is on already, you must turn the power off for at least 5
seconds and then turn the power back. Wait for 6 seconds at least then
make learn function setting. If the fan is running after turn power back, still
wait for at least 6 seconds and then press and hold the “SET” button for
about 4 seconds until buzzer inside receiver sounds. Your remote controller is
ready to operate the fan.
Note: If you want to control a fan with 2 transmitters (Wall mount or hand-held
transmitter, turn the power off for at least 5 seconds and then turn the power
back and wait for at least 6 seconds for learn function setting. Setting for
both transmitters must be done within 1 minute of restoring power to the fan.
A fan can be controlled by 2 transmitters maximum when choose Learning
Mode.
Figure 2
White AC IN N
Green
120 VAC SUPPLY
Black To Hot
Black AC IN L
Black To Fan
Outlet Box
Figure 1
Black from fan (Receiver)
White from Fan (Receiver)
OFF O N
Green from
ON
OFF
ON/OFF Switch
Wall
Transmitter
OFF O
N
OFF ON
Open End
Switches
Cover
OFF O N
SET
AAA 1 .5
V
Figure 3
SET
DIP Switches
UPPER
LOWER
Receiver
Bracket
Wall plate
+
+
-
-