
Installation Guide


6
© 2018 Monte Carlo Fan Company
9/2018
18
19
21 22 23
20
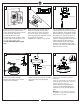
Install 2 of the screws to the side panel of
mounting bracket corresponding to the
open slotted holes on the canopy upper
rim, screws provided. Remove the thread
studs from the lower part of the mounting
bracket.
Lift fan to mounting bracket, aligning the
“L” shape holes on canopy with the
screws on the mounting bracket. Turn the
fan clockwise to lock in position. Install
the other 2 canopy mounting set screws
from the hardware pack and tighten all
screws securely.
Install blade bracket with blade by 3 blade
screws and washers provided. Tighten
screws securely. Repeat this process for
remaining blades.
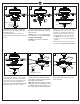
Remove shipping stabilizers from motor
assembly.
Install the blade assembly to motor using
the preinstalled screws. Tighten screws
securely. Repeat this process for
remaining blade assemblies.
Remove switch housing cap by removing
the set screws. Keep screws.
Remove the tap from bottom of the switch
housing cap.
Place switch housing cap over light lead
wires and Installation light fixture onto the
switch housing cap with lock washer and
hex nut provided.
Connect light lead wires. White to white,
blue (or black) to black (or blue). Make
sure the quick connectors are clasped
firmly.
Blade bracket
Blade
Shipping
stabilizers
Light fixture
Switch housing cap
Tap