
Installation Guide

© 2011 Monte Carlo Fan Company
5/25/2013
4
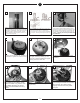
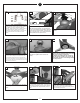
Loosen set screw and then remove
cross pin from yoke for downrod
to slip into yoke. Keep the cross
pin for later use.
12
Re-place the upper motor housing onto
the fan motor. Be sure the holes are all
aligned.
Note: Align the hole on top housing la-
beled “REVERSE” with the reverse switch.
10
Tighten the screws removed from
step 5. Tighten securely.
11
Place the canopy over the downrod
as shown above.
13
Thread the leadwires and safety
cable through the downrod.
14
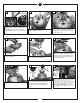
Place the downrod into the yoke
aligning the holes on downrod with
the holes on the yoke and then re-in-
stall the cross pin removed in step
12. Tighten securely.
15
Tighten the set screw on the yoke.
16
Set screw
Cross pin
Reverse switch
Reverse switch
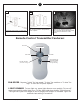
For Canadian installation and for USA fan and light
kit combinations over 35 lbs, in both flush and
downrod modes the safety cable must be installed
into the house structure beams using 3” lag
screws, washers and lock washers provided. Make
sure that when the safety cable is fully extended
the lead wires are longer than the cable and no
stress is placed on the lead wires.
Note:If Installing The Secondary Support Safety
Cable in the U.S., Do Not Remove Knockouts In
The Outlet Box.
18
Safety cable installation
Safety Cable
Lag Screw
safety
cable
3” lag
screw
lock
washer
washer
Hang the assembled fan from the
mounting bracket. Be sure to turn
the fan to lock the slot/tab from
the fan and mounting bracket in
place.
17
Tab
Slot