
Instructions / Assembly


6
© 2015 Monte Carlo Fan Company
9/15/2015
19
20
22 23
21
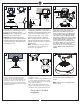
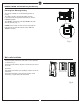
Install 2 of the screws to the side panel
of mounting bracket corresponding to the
open slotted holes on the canopy upper
rim, screws provided. Remove the all
thread studs from the lower part of the
mounting bracket.
Lift fan to mounting bracket, aligning the
“L” shape holes with the screws on the
mounting bracket. Turn the fan clockwise
to lock in position. Install the other 2
canopy mounting set screws from the
hardware pack and tighten all screws
securely.
Insert blade into the slot on flywheel.
Install blade with screws and fiber
washers provided, aligning each of the
holes as shown and tighten all screws
securely. Repeat this process for
remaining blades.
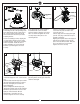
Loosen 2 and remove 1 preassembled
screw from the plate on motor. Save
screw for later use.
Connect plug from fan to plug from light
pan. Be sure plugs connection clasped
together completely.
Aligning the keyhole slots on the light pan
with the preassembled screws on the
plate. Twist clockwise till lock. Reinstall
the screw which was just removed.
Tighten all screws securely.
Loosen 2 and remove 1 preassembled
screw from light pan. Save screw for later
use.
Connect white wire from light pan to white
wire from LED light kit and then connect
blue wire from light pan to black wire
from LED light kit.
Attach LED light kit onto the light pan,
aligning the keyhole slots on the LED light
kit with the preassembled screws on the
light pan. Twist clockwise till lock.
Reinstall the screw which was just
removed. Tighten all screws securely.
Attach glass by locating dimples in light
pan with grooves on the glass and twist
clockwise until tight.
Plate on motor
Light pan
LED light kit
Blade
Glass
Blue
White
White
Black