
Installation Guide


3
1 2 3
4 5 6
© 2020 Monte Carlo Fan Collections
12/2020
ON
OFF
ON
OFF
Before you begin installing the fan, Switch
power off at Service panel and lock
service disconnecting means to prevent
power from being switched on
accidentally. When the service
disconnecting means cannot be locked,
securely fasten a warning device, such
as a tag, to the service panel.
Use AC 120V/60HZ power supply
only.
Before installing this fan make sure the
outlet box is properly installed to the
house structure. To reduce the risk of
fire, electric shock, or personal injury,
mount to outlet box or supporting system
acceptable for fan support.
(Mounting must support at least 35 lbs.)
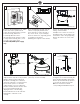
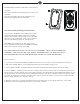
Remove decorative ring from canopy by
turning counterclockwise.
Partially loosen 2 of the set screws on
mounting bracket corresponding to the
slotted holes on the canopy upper ring.
Remove the other 2 set screws. Save
screws.
Use metal outlet box suitable for fan
support and use only the screws provided
with the outlet box (must support 35
lbs). Before attaching fan to outlet box,
ensure the outlet box is securely fastened
by at least two points to a structural
ceiling member ( a loose box will cause
the fan to wobble). Remove the two outlet
box screws provided with the box,
aligning the holes of the mounting
bracket with the holes of the outlet box.
Reinstall the 2 outlet box screws
securely.
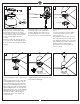
Partially loosen downrod set screws from
yoke at top of motor assembly.
Remove hanger ball from downrod by
loosing the set screw and removing the
pin as shown in illustration. Keep parts.
Remove preassembled keeper pin and
cross pin from downrod. Keep parts
Note: A 4” downrod is included
corresponding with installation step 8.
Mounting bracket
Canopy
Mounting bracket
Decorative ring
Yoke
Downrod
Cross pin
Keeper pin
Pin
Hanger ball
Set screw