MAPZ-SS Pizza Oven Instruction Manual and Installation Instructions 1
Contents Contents Warnings ______________________________________ 4 4 Warnings Before Lighting Instructions________________________5 5 Before Lighting Instructions Safety Practices to Avoid Injury______________________6 6 Safety Practices to Avoid Injury Parts List ________________________________________7 7 Parts List Assembly Instructions _____________________________ 8 8 Assembly Instructions Connecting / disconnecting LP Gas Cylinder _____________16 13 Electrical Warning Lighti
Read Carefully WARNING Leave the instructions with the consumer for the consumer to retain for future reference. FOR OUTDOOR USE ONLY. Do not store or use gasoline or other flammable vapors in the vicinity of this of any other appliance. An LP cylinder that is not connected for use shall not be stored in the vicinity of this or any other appliance.
Before Lighting Inspect the gas supply hose prior to turning on the gas. If there is evidence of a cut, any wear or abrasion it must be replaced prior to use. Only the pressure regulator and gas hose assembly supplied with this appliance should be used. Screw the regulator onto the gas cylinder. Leak check the hose and regulator connections with a soap and water solution before lighting the appliance. LP GAS CYLINDER WARNING 1. 2. 3. 4. 5. 6. 7.
Safety Practices to Avoid Injury When properly cared for, your grills will be safe and reliable for many years. However, the grill produces intense heat that can increase accident potential and must be handled with extreme care. When using this grill basic practices must be followed, including but not limited to the following: Do not repair or replace any part of the grill unless specifically recommended in this manual. All other service should be referred to a qualified technician.
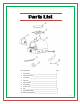
Parts List No. Description 1. 2. 3. 4. 5. 6. 7. 8. 9. 10.
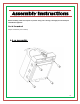
Assembly Instructions Before assembly, make sure all parts are present. If any part is missing or damaged, do not attempt to assemble the appliance. Tools Required Philips screwdriver (not included) 1.
2.
3. Chimney Assembly 4.
5.
6. Grease Pan Assembly 7. Clean the Fire Box Base Tools required: Philips screwdriver WARNING The bottom needs to be assembled and fixed by screw after each cleaning.
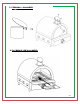
8. Connecting the 1lb Gas Cylinder WARNING Always keeps the gas bottle in an upright position. The maximum 1lb LP gas tank is 4” in diameter and 8” tall. The cylinder must be disconnected when the oven is not in use Only cylinders marked as “propane” must be used.
9. Connecting to a 20lb Gas Cylinder Additional gas hose to connect the 1lb gas cylinder regulator and 20lb gas cylinder valve. WARNING WARNING Always keeps the gas bottle in an upright position. The maximum 20lb LP gas tank is 12.2” in diameter and 17.9” tall. The cylinder must be disconnected when the oven is not in use. The cylinder used must include a collar to protect the cylinder valve. The minimum distance for the oven and the 20lb gas tank is 40”.
10.
Connecting the Liquid Propane Gas Cylinder To connect the liquid propane gas cylinder: 1. The cylinder valve should be in the OFF position. 2. Make sure the burner valve is in the OFF position. 3. Inspect the valve connections, port and regulator assembly. Remove debris and inspect the hose for damage. 4. When connecting the regulator assembly to the valve, use your hand to tighten the nut clockwise until it stops.
Operating Instructions Using the Grill Each burner is rated at 10,000BTU/Hr To Begin: 1. Make sure the grill has been leak tested and properly placed. 2. Remove any remaining packaging material. 3. Light the grill burner using the Lighting Instructions below. Lighting Instructions To Light the Burner 1. Read the instructions before lighting. 2. Make sure the control knob is in OFF position, and then turn the liquid propane cylinder valve ON by slowly turning counterclockwise. 3.
Care and Maintenance Stainless Steel There are many stainless steel cleaners available. Always use the mildest cleaning process first, scrubbing in the direction of the grain. DO NOT use steel wool as it will scratch the surface. To touch up noticeable scratches in the stainless steel, sand very lightly with dry 100 grit sand paper in the direction of the grain. Grease specks can gather and bale on the surface of the stainless steel, giving the appearance of rust.
Pizza Stone 1. 2. 3. 4. 5. 6. Do not use the stone over an open flame Avoid extreme temperature changes to the stone. Do not place frozen foods on a hot stone. The stone is fragile and can break if bumped or dropped. The pizza stone is very hot during use and stays hot for a long time after use. Do not cool the pizza stone with water when the pizza stone is hot. After cleaning the pizza stone with water, dry the stone before next use.
Customer service Mont Alpi Phone: 949-207-9595 25541 Arctic Ocean Dr Email: John@Mont AlpiOnline.com Lake Forest, CA 92630 More from Mont Alpi MAi805 – Island. All 304 S/S with faux granite surfaces (white). COVMAi805 – 805 Island durable weather resistant cover. MABi400 – Built-in Grill. Natural gas and propane ready.