INSTALLATION GUIDE Flat Panel Arm Mount MLA100-S Support 10" to 24" Screens Max Load Capacity: 30 lbs (15 kg) VESA 100x100 compatible
Note: Read entire instruction sheet before you start installation and assembly. WARNING • Be sure to read this entire manual thoroughly and you fully understand all the instructions and warning before attempting to begin your installation. • This product should only be installed by someone who has a basic knowledge of buiding construction,in stallations and fully understands these instructions.
Before you b egin, make sure all parts shown are included with your product. Parts may appear slightly different than illustrated. Parts List M4x12(x4) allen cap screw M6x40(x2) concrete anchor M4x20(x4) allen cap screw M6x60(x2) corss slotted head screw mount(AA) 3 of 6 ¢8.0x¢5.0x8(x4) spacer M5(x1) allen wrench M2.
Installation to Single Wood Stud Wall WARNING • Installer must verify that the supporting surface will safely support the combined load of the equipment and all attached hardware and components. • Tighten wood screws so that wall plate is firmly attached, but do not overtighten. Overtightening can damage the screws, greatly reducing their holding power. • Make sure that mounting screws are anchored into the center of the stud. The use of an "edge to edge" stud finder is highly recommended.
Installation to Solid Concrete or Cinder Block WARNING • When installing the wall mounts on cinder block, verify that you have a minimum of 1-3/8" of actual concrete thickness in the hole to be used for the concrete anchors. Do not drill into mortar joints! Be sure to mount in a solid part of the block, generally 1" minimum from the side of the block. Cinder block must meet ASTM C-90 specifications.
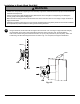
C Fix the AA on the display screen with VESA® mounting Pattern Choose hole pattern as shown in detail 3 for VESA mounting pattern. Begin with the shortest length screw, hand thread through adapter plate into screen as shown in detail 4. Screw must make at least three full turns into the mounting hole and fit snug into place. Do not over tighten. If screw cannot make three full turns into the screen, select a longer length screw from the fastener pack. Repeat for remaining mounting holes.