INSTALLATION INSTRUCTIONS 48”Designer Brass Hood ZVC48DNB1 MONOGRAM.
Safety Information BEFORE YOU BEGIN Read these instructions completely and carefully. Ŷ IMPORTANT — Save these instructions for local inspector’s use. Ŷ IMPORTANT — Observe all governing codes and ordinances. Ŷ Note to Installer — Be sure to leave these instructions with the Consumer. Ŷ Note to Consumer — Keep these instructions with your Owner’s Manual for future reference. Ŷ Skill Level — Installation of this appliance requires basic mechanical and electrical skills.
Installation Instructions CONTENTS $GYDQFH 3ODQQLQJ ......................................................... 4 Unboxing ....................................................................... 4 Step 1, Determine Ductwork and Wiring Locations ...... 5 Step 2, Install Hood onto Wall....................................... 6 Step 3, Install Hood Insert into Hood ............................ 7 Safety Information ......................................................... 2 3URGXFW 'LPHQVLRQV ....................
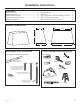
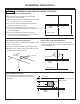
Installation Instructions INSTALLATION CLEARANCES This hood is designed to be installed onto a wall. Install this hood 30" minimum to 36" maximum above the cooking surface. Top Vent Installation NOTE: Clearances may vary due to type of cooking product and local codes. Check with local inspectors to be sure standard is applicable. Back Vent Installation SOFFIT OR UPPER CABINETS 30" MIN. 36" MAX. 30" MIN. 36" MAX.
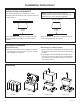
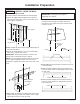
Installation Instructions STEP 1 DETERMINE HOOD AND DUCTWORK LOCATIONS MARK LOCATION OF WOOD SUPPORT Top of Hood Ŷ 8VH D OHYHO WR GUDZ D FRRNWRS FHQWHUOLQH ORFDWLRQ Draw the line to ceiling height. Ŷ 0HDVXUH GHVLUHG GLVWDQFH IURP WKH ERWWRP RI WKH KRRG to the cooking surface, 30” min. to 36” max. Ŷ 8VH D OHYHO WR GUDZ D VWUDLJKW KRUL]RQWDO SHQFLO OLQH indicating the bottom of the hood.
Installation Preparation STEP 2 INSTALL HOOD TO WALL Mount Wood Support to Wall Ŷ /RFDWH DW OHDVW YHUWLFDO VWXGV DW WKH ZRRG VXSSRUW Ŷ &HQWHU WKH VXSSOLHG ZRRG VXSSRUW OHIW WR ULJKW DQG below the 16” marked line. Use the center hole in the wood support as guidance. IMPORTANT: Framing must be capable of supporting up to 150 lbs. Ŷ 3ODFH WKH KRRG RYHU WKH ZRRG VXSSRUW %H VXUH WKH mounting screws engage the keyhole slots in the back of the hood. Tighten the screws.
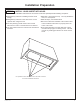
Installation Preparation STEP 3 INSTALL HOOD INSERT INTO HOOD 5HIHU QRZ WR WKH LQVWDOODWLRQ LQVWUXFWLRQV IRU WKH &XVWRP +RRG ,QVHUW =9& ZLWK WKH IROORZLQJ H[FHSWLRQV Ŷ 'LVUHJDUG DQ\ UHIHUHQFH WR EXLOGLQJ D FXVWRP ZRRG canopy. Ŷ 6NLS 6WHS ,QVHUW +RRG /LQHU
NOTE: While performing installations described in this book, safety glasses or goggles should be worn. NOTE: Product improvement is a continuing endeavor at Monogram. Therefore, materials, appearance and specifications are subject to change without notice. 31-2000730 Rev.