
Installation Instructions


7
Installation Instructions
STEP 1 CONTINUED
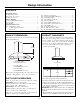
• Arrange cross framing in the ceiling to suit the
existing structure. See examples.
– Secure each 2 x 4 block with at least four (4), #10
wood screws, 3” long (not supplied). Use 8 wood
screws total for the two supports.
• The cross framing must be accurately aligned to
assure correct positioning of the hood.
• The cross framing must be level in all directions.
Check with a spirit level and adjust if necessary.
IMPORTANT: The ceiling structure must be capable of
supporting the weight of the hood (approximately 300 pounds) and
any inadvertent user contact loads. The hood support frame will
be supported by the 2 x 4 min. cross framing.
Ductwork
• Use the shortest and straightest duct route possible.
For satisfactory performance, duct run should not
exceed 100 feet equivalent length for any duct
configuration.
• Refer to “Duct Fittings” chart to compute the maxi-
mum permissible length for duct runs to the out-
doors.
• This vent hood must use 8” round duct. The 8”
round duct can transition to 3-1/4” x 12”.
• Install the house ductwork to run horizontally
between ceiling joists or straight up through the roof.
Finish the Ceiling
• Finish the ceiling surface. Be sure to mark location
of the ceiling joists and cross framing. Check to be
sure the ceiling is level, use shims if necessary.
Support
Frame
Opening
Upper Half
Of Support
Frame
Ceiling
Joist
2x 4 Min.
Cross Framing
Height
Adjustment
Slot
Front
of
Hood
11-1/4"
7-1/4"
Ceiling Joint
2x4
8"
Duct
Vent Straight Up
Through The Ceiling
Flat
*Vent Between
Ceiling Joists
Standing
8" Round
Duct Elbow
*Depending on available space.