
Specification Sheet
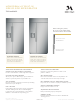


For questions about your
appliance, please call 1-800-626-2000.
Product Specication Created 10/19
HELPFUL TIPS
PAGE 3 OF 4
HELPFUL TIPS
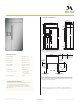
FRONT VIEW SIDE VIEW
W
24" (61.0)
2 1/4"
(5.7)
4 7/8"
(12.4)
7/16"
(1.1)
Trim overlap
3 1/2"
(8.9)
E
WATER
41 1/2" (105.4)
18" (45.7)
*83 1/2" min
*84 1/2" max
(212.1-214.6)
*Trim will overlap
additional 7/16"
3 1/2"
(8.9)
75"
(190.5)
From floor
to bottom
of electrical
area
6"
(15.2)
5"
(12.7)
5"
(12.7)
5"
(12.7)
ZISP420DXSS
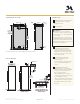
SIDE VIEW INSTALLED
UNDER SOFFIT
SOFFIT
SIDE VIEW INSTALLED
WITH WOODEN WALL STUDS
AND NO SOFFIT
FRONT VIEW INSTALLED
WITH METAL WALL STUDS
AND NO SOFFIT
*84"
(213.4)
*Or installation
height from floor
2" x 4"
Cut to 35" Length
Screws mounted
into vertical wall
studs
Top Case Trim
3/4"
Min.
Side View Top
Case Trim
Install Screws
Through Trim and Into
3/4" Min. Wood Brace
A
B
E
FRONT VIEW SIDE VIEW
W
24" (61.0)
2 1/4"
(5.7)
4 7/8"
(12.4)
7/16"
(1.1)
Trim overlap
3 1/2"
(8.9)
E
WATER
41 1/2" (105.4)
18" (45.7)
*83 1/2" min
*84 1/2" max
(212.1-214.6)
*Trim will overlap
additional 7/16"
3 1/2"
(8.9)
75"
(190.5)
From floor
to bottom
of electrical
area
6"
(15.2)
5"
(12.7)
5"
(12.7)
5"
(12.7)
ZISP420DXSS
SIDE VIEW INSTALLED
UNDER SOFFIT
SOFFIT
SIDE VIEW INSTALLED
WITH WOODEN WALL STUDS
AND NO SOFFIT
FRONT VIEW INSTALLED
WITH METAL WALL STUDS
AND NO SOFFIT
*84"
(213.4)
*Or installation
height from floor
2" x 4"
Cut to 35" Length
Screws mounted
into vertical wall
studs
Top Case Trim
3/4"
Min.
Side View Top
Case Trim
Install Screws
Through Trim and Into
3/4" Min. Wood Brace
D
C
A
Mounting the junction box in this location
will also allow for front accessability
through access panel.
B
Water supply area.
WARNING:
e refrigerator is top heavy and must be
secured to prevent the possibility of tipping
forward. Failure to do so may result in death
or serious injury.
e information below is for cabinet design
only. When installing the anti-tip system you
must use the product installation instructions.
Determine your installation construction and
required anti-tip configuration.
C
Installed Under Soffit
After installing unit into installation
opening, raise grille panel and screw
metal case sides to adjacent cabinet. When
installed under a soffit, the soffit cannot
exeed 24" deep. e top case trim overlaps
the bottom of the soffit.
D
Wooden Wall Studs and No Soffit
• Cut a 2" x 4" block and secure to
brackets provided.
• Secure brackets to back wall of opening at
84" or your installation height from
the floor.
E
Metal Wall Studs and No Soffit
is method requires securely fastened
cabinets on both sides and a 3/4" minimum
wood brace above unit, with it’s front
surface 24" from back wall.
• After installing unit into opening, raise
grille panel and attach metal case top trim
to 3/4" minimum wood brace.
• e brace spanning the enclosure must be
securely fastened to cabinets on both sides.
See Installation Instructions for detailed
instructions.
e refrigerator will project forward, slightly beyond adjacent cabinetry.
STANDARD INSTALLATION
ANTI-TIP BRACKET