
Installation Guide

40
Installation Instructions - Flush Installation
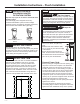
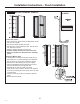
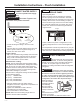
STEP 15 INSTALL TOEKICKS
• Locate the supplied toekicks (shipped taped to the
side of the refrigerator.
• The wider set of toe kicks will be used for flush
installation. You can discard the other set of toe
kicks.
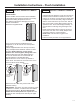
• Attach the LARGER toekick to the refrigerator using
ONLY the top center hole (1).
• Attach the toekick skirt to the refrigerator using the
three lower slots (2).
• A custom toekick can be installed to match or
complement the surrounding cabinetry. Use the
supplied toekick as a template to cut the shape.
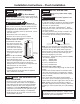
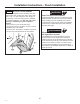
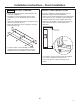
INSPECT FINAL INSTALLATION
Check door alignment. Stand back away from the
refrigerator to inspect the final installation.
• Check to be sure the handles are evenly aligned with
each other at the top. To adjust, loosen the handle
screws and slide up or down. Tighten the screws.
• Shipping or the addition of heavy door panels may
have caused the doors to move slightly out of
alignment.
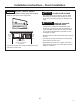
• If necessary, the fresh food door may be adjusted
up or down to align with the freezer door.
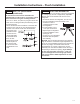
• Use a 5/16” wrench to adjust the hinge pin as
shown.
Bushing
Door Hinge
Case Hinge
5/16" Wrench
Raise
Door Out of
Alignment
1
2
31-49171