
Use & care guide


ZKHTSS1 for 3/4" Panels
Tubulor Stainless Steel [-[;_nctles
Step 1:
Remove
Handles
• Open doors to 90°. Remove the screws from the full-
length handles of both doors.
• Retain screws, discard handles.
Note: If a custom collar is to be used, order ZWCD1
Trim Kit for 36" and 42" wide models. Order ZWCD2 for
48" wide models.
Step 2:
Match
Handle Extrusions
to Panels
• Cut a piece of corrugated to use as a pad to protect
the panel finish. Use 1/2" thick section of plywood to
protect flooring when drilling.
• Place custom panels on the pad, appearance side
down.
Note: If panels are wood, be sure to note which end is
the top so that wood grain is in the correct direction
on both (or all 3) panels.
• Place new extrusion against the handle side of the
panels.
• Align the extrusion evenly with the top and bottom of
the panel.
• Follow the same procedure on the opposite panel.
• Tape the extrusions to the panels to prevent
movement.
• Center punch and drill 1/8" pilot holes through the
holes in the extrusion and into the panel.
• Turn panel over. On the appearance side, use 9/32" bit
to enlarge clearance hole.
IMPORTANT: Hole locations must be exact to accept handle
standoff and handle assembly.
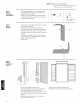
Formodelswith full width dispensertrim and 2 piece
freezer panels:
• Carefully, align the top of the upper panel and the
bottom of the lower panel with extrusion ends.
Models
With FullWidth
DispenserTrim
Note: Besure to orient
extrusions and handles
correctly. The top endsof
the extrusionsare cutout to fit
the shapeof the top of the
door.
AlignExtrusion
Panel
Fre6zer
Extrusion Extrusion
43