
Use & care guide


Option 2 Installation
ZKH1 Trim Kit (For 1/4" Panels)
Support for Custom H;_ndles
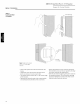
Step 4
Install
custom handle
• Drill clearance holes through the handle bracket and
the dispenser trim.
• Install screw(s) long enough to pass through the
handle bracket, dispenser trim and into the
custom handle.
HandleBracket
DispenserTrim
Note: The customhandle must
be installed against tile handle
bracket.Tile customhandle
cannotexceed11-3/4" length.
I
_..._ ii DispenserTrim
_ CustomHandle
/
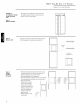
Step 5
Mount
assembled
dispenser trim
• Mount assembled dispenser trim with handle onto
the door
• Drive 2 screws through the top and bottom of the
handle bracket into the steel door.
• Re-install 3 screws at top and bottom of
dispenser trim.
Important: Theilandle
bracketmust be securedto ti_e
steel door.if it is not secured
properly,the dispensertrim will
pull away fromthe door.
Secure •
Assembled |
Dispenser |
Trim |
With
Screws
Secure
Handle
Bracket
With
Screws
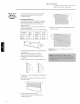
Step 6
Install
custom handle
extrusion
• Slide decorator panels into the trim, top and bottom.
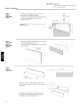
• Slide freezer door extrusion in between panels and
steel door. Secure with screws.
• To install fresh food handle follow the same procedure
as shown in Option 1.
i_i!i_ii_ii_ii_ii_ii_ii_ii_ii_ii_ii_ii_ii_ii_ii_ii_ii_ii_ii_ii_ii_ii_ii_ii_ii_ii_ii_ii_ii_ii_ii_ii_ii_ii_ii_ii_ii_ii_ii_iiii!ii_i_!_!i_i
¢,
Freezer
_Handle Side
Extrusion
25