
Installation Manual


9
31-1000190 Rev. 0
Installation Instructions - Reversing the Door Swing
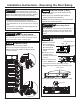
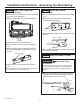
STEP 5 REINSTALL HINGE
BRACKETS
Ŷ Move top hinge bracket to bottom and bottom bracket
to top.
Ŷ Ensure the 2 rectangular slots of bracket are on
outside, hinge side of case.
Ŷ Install both brackets with 3 T-30 Torx screws 45 in/lb
(5.1 Nm).
Ŷ Start 2 screws in each bracket for hinge mounting but
do not tighten all the way.
Rectangular
Slots
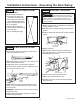
STEP 6 REMOVE HINGES FROM
DOOR
Ŷ Remove 3 screws securing each hinge from the top
and bottom of the door and one screw securing the
support bracket to the door (T-30 Torx)
WARNING
Door Hinge Pinch
Point Hazard
Door hinges are under tension and should be left in
the open position throughout the reversal process.
Closing the hinge can lead to a finger pinch point
hazard.
Hinge
Support
Bracket
Shims
Screws for
Hinge Brackets
Housing Key Holes
STEP 4 MOVE LIGHT SWITCH
HOUSING (Cont.)
Ŷ Slide housing forward and down to remove from case
and grommets on case bottom.
Ŷ Keeping it connected to the unit, lay housing aside.
Ŷ Remove 2 grommets with Phillips driver.
Ŷ Move grommets to the set of 2 holes on opposite
side.
Ŷ Align housing key holes over grommets and then
slide back until engaged. Ensure wires do not get
pinched.
Ŷ Install T20 Torx screw into bottom hole to hold in
place.
Ŷ Turn on master switch and install front access cover
by replacing two 1/4” hex head screws.
Grommets