
User`s manual


QUICK START
Monomachine SFX-6/60 USER’S MANUAL 11
QUICK START
This quick start will guide you through some of the basic operations get you
started using the Monomachine. First connect your unit as described in sec-
tion “CONNECTING THE UNIT” on page 7.
• The DATA ENTRY encoders have accelerated editing when pressed.
By default, the knobs increase/decrease the parameter value in
steps of +1/-1. When pressed, the step length is higher, allowing
quicker adjustments.
This guide assumes you have a Monomachine SFX-6 Keyboard or SFX-60
Tabletop with a midi keyboard connected. If you have a SFX-60 you need to
take care to set the midi keyboard to play on the correct midi channel. When
we refer to play a sound in Multi Trig mode, a MIDI keyboard should be
sending on the Multi Trig channel. By default this is set to MIDI channel 7.
When playing on a specific track we recommend using the Auto Track chan-
nel which will switch focus depending on which track is selected with the
[TRACK] keys. By default the Auto Channel is assigned to midi channel 9.
Please refer to section “MIDI CHANNELS” on page 89 for more information
on the MIDI channel assignment of the Monomachine.
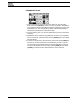
SELECTING AND PLAYING A PATTERN
1. Verify that the <PATTERN> LED is lit and the <SONG LED> is not. If this
isn’t the case, press the [PATTERN/SONG] key.
2. Check the <BANK GROUP> LED to see if bank group A-D or E-H is
active. If needed press [BANK GROUP] key to toggle the active bank
group. For this demonstration use group A-D.
3. To select pattern A01, press and hold the pattern selection key [A/E] and
then press the [TRIG] key 1. You can see the index of the currently
selected pattern in the lower left corner of the display. Each pattern auto-
matically loads the kit it was created with. The name of the kit is also
shown in the display.
4. To listen to the pattern, press the [PLAY] key. The pattern starts playing
and loops back to the beginning again when it has reached its end.
Pressing [PLAY] while playing pauses the playback.
5. To change pattern during playback, simply select a pattern the same way
as in step 3. The display will show the selected pattern beside the current
one, but with an arrow pointing between them. This indicates that once
the current pattern has played to its end, the new selected pattern will
start playing.