
User`s guide

PAGE 18
• Click on “About”, then “Local IP Addresses” and make note of the IP address that your
computer is using on your network.
• Connect the Ethernet Gateway directly to the Ethernet port of your PC using a standard
Ethernet cable. Conrm that the PC has no other internet connection (turn off Wi-Fi).
Conrm the PC rewall does not prohibit an inbound connection. Plug power cable into
the Ethernet gateway.
• Plug in the power cable.
• While the device is booting, press and hold the Reset Button on the back of the
gateway. The button must be held in the down position by the time the third green light
illuminates, or else another attempt will need to be made. When the device nishes
booting, all three lights will toggle red, green. Release the button and the device is in
local conguration mode. Do not hold the Reset button for more than four seconds (that
will factory reset the device).
The lights will ash green once every other second while the device attempts to resolve
Ethernet Link State. The lights will ash green once every second while the device
attempts to resolve IP addresses with the host PC. Finally, the lights will ash green
twice every second when device is waiting for valid web trafc.
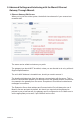
• Once the PC has setup the direct network, use a web browser (e.g. Chrome) and go to
“192.168.100.1”. The Ethernet gateway Setup screen should now be displayed.
Note: The lights will all turn solid green once this connection has been established.
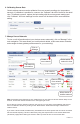
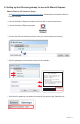
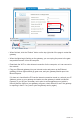
• Click on the “Data Interfaces” tab.
• Under “Default Server Conguration” enter the IP address that you noted from the
iMonnit Express software into the primary and secondary server [URL/IP] boxes, and
use 3000 as the default communication port, then click “Save Changes”.