
Specifications


SECTION
L
CARE
OF THE
HEATER
Push
operation
switch
to
"OFF"
remove
the AC
Plug
from
the
wall
outlet
and
wait
approximately
30
minutes
for
the
heater
to
cool before performing
any of the
following steps.
Step
1:
Retrieving
Objects
from
Inside
the
Heater
Should
an
object fall inside
the
heater, through
the
grill
openings,
it
must
be
removed
to
avoid affecting
the
operation
of the
heater.
After
allowing
the
heater
to
cool,
remove
the
front
cover
panel.
(See Step
5 of the
previous
section.)
After
the
object
has
been removed, replace
the
front
cover
before attempting
to
re-start
the
heater.
Step
2:
Cleaning
the
Cabinet
When
the
cabinet
is
soiled, wipe
it
with
a
damp cloth.
Restore
the
shine with
a dry
cloth.
The use of
abrasive household cleaners
may
dull
the
finish.
Step
3:
Checking
the
Flue Pipe
At
the
beginning
of
each
heating
season,
check
the
inside
of the
flue pipe. Foreign matter, spider webs,
etc. must
be
removed.
Be
sure
all
fittings
and
joints
are
tight.
Step
4-Cleaning
the
Interior
Remove
the
Front Cover Panel
(as
described
in
Step
5
of the
previous section),
and
vacuum
and
wipe away
dust
or
other
accumulation.
Look
for
signs
of
fuel leakage around
the
joint pipe
and
the
bottom
of the
cabinet.
If
fuel
is
detected, wipe
it
away
and if
necessary, contact your
MPI
dealer
for
any
necessary repairs.
Step
5:
Cleaning
the
Blower
Guard
Heating efficiency
will
be
reduced
if the
blower guard
at
rear
of the
cabinet
is
blocked with dirt
or
dust.
Blockage also produces
a
rise
in
heat that could cause
the
heater
to
shut off.
Wipe
the
guard clean
at
least once
a
week.
Step
6:
Cleaning
the
Fuel Strainer
The
strainer
of the
fuel constant level valve should
be
cleaned once
a
year
and
before storing heater
at the
end of
each season.
Step
6-A:
Turn
knob
of the
shut-off valve installed
at the
external
tank
to
close
the
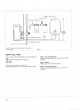
fuel line.(See Figure 17).
Step
6-B:
To
catch
the
fuel which will drain out,
set the
drain
guide made
by
cardboard below
the
strainer cover,
with
a
small container under
it.
(See Figure
23)
Step
6-C:
Loosen
the two
screws from
the
strainer cover
and
remove.
Step
6-D:
Remove
the
strainer
and
wash with pure kerosene.
If
strainer
is
damaged, replace
it
Step
6-E:
Return
the
strainer
to its
original position. Replace
strainer cover
and
screw
to
secure.
Step
6-F:
Wipe
away
any
spilled
kerosene.
Step6-G:
Turn
the
knob
of the
shut-off valve
to
open. Check
for
kerosene
leakage.
NOTE:
Your
Monitor
may
sometimes
require
more
service
than
that
shown
above.
Should
this
occur
please
contact
your
Monitor
Products,
Inc.,
dealer
for
service.
A
preseason
maintenance
check
up
could
be
performed
by
your
dealer
to
ensure
trouble
free
operation
during
the
season.
Ask
him for
details
of his
routine
maintenance
program.
22