
Specifications

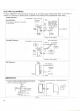


SECTION
F
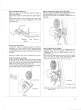
STARTING INSTRUCTIONS
Step
1:
Plug
in the
Heater
Plug
in the AC
cord,
and
route
it
away from
the
area
of
the
flue pipe.
It is
recommended
that
no
other
appliance share
the
same outlet.
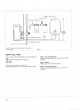
Step
2:
Prime
the
Heater
If
using
the
heater
for the
first time,
or if the
heater
has
not
been
in
operation
for
sometime, press
the
fuel
set
lever
at the
lower right hand side
of the
cabinet
and
release
it
slowly
2 or 3
times (Figure 18).
/!\
CAUTION:
Do not
continue pressing
lever
repeat-
edly
as
this
may
cause overfilling
of
constant
level
valve inside.
NOTE:After
a
power
outage,
there
is a
three-minute
waiting
period
before
the
unit
restarts,
provided
the
ON/OFF
switch
is in the
"ON" position.
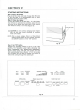
Step
3:
Set
"ON"
Button
Depress
the
operation button
to put it in the
"ON"
position.
The
"Operation Lamp" lights
indicating
"Set
Room
Temperature"
and
"present
roomi
temperature".
Burner
status lamps will light
and
ignition will start
after
approximately three minutes.
In 5 to 10
minutes
the
circulation
fan
will start
to
operate,
and
warm
air
will
be
felt coming through
the
cabinet grill.
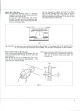
Fuel
Set
Lever
Fig.
18
RUN
AUTO
ECONOMY
PLUS
BURNER
STATUS
SET
ROOM
TEMP
AM
PM
i-
n
-
c
Q
/
i_i
-
/_/
o
OPERATION
TIMER SELECTOR TIME/TEMP
SET
CLOCK
ON/OFF
AUTO
ECONOMY
SFT
1st
2
nd
3rd 4th
PLUS
—
-_.
Jill
iii
_
TIME!
I
HOUR
MINUTE
SET
CLEAR
CD
i—i
CD CD CD CD
TEMP
[ | UP
DOWN
Fig.
19
17