
Specifications

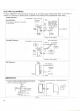


NOTE:
The
"STANDARD"
damper
is to be
used
with
extension
kits
up
to a
total
overall
length
of 20
inches
and a
maximum
of 3
bends
(90°
elbow).
The
"EXTENSION"
damper
must
be
used
when
extension
kit or
kits
exceed
20
inches.
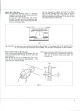
Step
13:
Install
the
Flue
Pipe
Holder
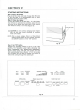
Place
the
ring
of the
flue pipe holder around
the
flue
pipe.
The
other side
of the
holder hooks
in a
slot
directly above
the
joint pipe
at the
rear
of the
heater
(See
Figure 16).
Step
15:
Recheck
the
Heater
Before
proceeding, check again
to be
sure there
are
no
flammable materials close
to the
heater. Check
to
be
sure
the
heater
is
level.
Examine
the
flue pipe
to be
sure connections
are
tight.
Flue
Pipe
Holder
Fig.
16
Step
14:
Secure
the
Heater
Insert
the
narrow ends
of the 2
wall clamps into sockets
on
the
rear
of the
heater.
Loosen
the
adjustment screws
and
extend
the
clamps
until
they touch
the
wall. Fasten
the
clamps
to the
wall with
2
#8x%
tapping screws.
NOTE:
If use of
wall
clamps
is not
feasible
or
practical,
the
heater
should
be
secured
by
screws
to
floor
through
punched
holes
in
spill
tray.
14