
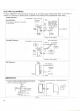
Specifications


Step
4:
Drill
a
Pilot Hole
NOTE:
The
following directions apply
to
"standard"
installation.
For
other methods, follow instructions
included with accessory kits.
For
walls
up to
8%
inches thick,
use a
short
flue
pipe;
for
walls
up to
14
1
/2
inches thick,
use
a
medium flue
pipe;
and for
walls
up to 20
inches
thick,
use a
long flue pipe.
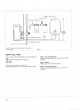
Use
the
template
to
position
the
hole
to be
drilled.
The
"red dot"
indicates
the
exact
center
of the
hole.
Using
an
electric
drill
and a
long
drill
bit,
make
a
pilot
hole
through
the
wall
(Figure
7). Be
sure
the
hole
extends
through
the
outside
wall.
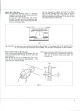
Position
of
hole
Template
Fig.
7
CAUTION:
The
opening
on the
inside wall should
be
approximately
%
inch higher than
on the
outside wall
so
the
flue pipe will slope downward when installed.
This
will allow condensation
to
drain outdoors.
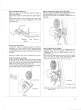
Step
5:
Cut the
Hole
for the
Flue
pipe
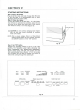
Using
a
hole
saw
attachment
and an
electric
drill,
cut
a
2
l
/z
inch
diameter
hole
through
the
inner
and
outer
walls
(Figure
8).
After
the
hole
is
cut,
use a
straight
edge
and a
level
to be
sure
the
inside
opening
is
approximately
%
inch
higher
than
the
outside
opening.
NOTE:
After cutting
the
inside wall, remove
the
insulation.
Make
sure there
are no
obstructions inside
the
wall,
such
as
electrical wiring,
water
pipes,
hot
air
ducts, etc.
Wall
Fig.
8
11