
Specifications

29
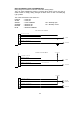
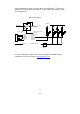
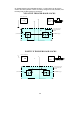
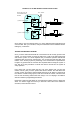
ADDING AFTERMARKET DOOR SOLENOIDS
12 V+ Fused
30
86
85
87a
87
30
86
85
87a
87
.
.
.
.
.
(-) Door Lock Trigger
(-) Door Unlock Trigger
These relays may be
on-board the alarm
module
Onc
e again it must be stressed that if you have obtained wiring information from
sources other than your own files, verify that information with a multimeter before
making any connections.
TESTING THE SECURITY SYSTEM
Once you have made and tested all the c
onnections from the security system to the
vehicle, you are now ready to insert the main fuse or plug in the main wiring loom
and test the system. It is most important that you read the operators manual and
understand how each type of system works. You can
then test and verify that every
feature of the security system is performing to the manufacturer’s specifications.
Program any options that the customer has requested before testing the system. It
may also be a wise precaution to relearn the remote contro
ls into the system to
verify operation.
First, make sure you have taken the keys out of the ignition and you have the
remote controls, plus you have opened the driver’s window. Arm and disarm the
security system and observe that the lights flash and, if t
he alarm is connected to
the vehicle’s central locking system, locks and unlocks the vehicle. Check that the
LED is also functioning and that the siren chirps, or is not chirping in accordance
with the customer’s programming instructions.
Rearm the system
and wait about ten seconds before opening a door to trigger the
alarm. If it doesn’t trigger check that you found the correct door wire. Retest for
each door, bonnet and boot circuit.