
Owner's Manual


71D0530
10
GCUF Vent-Free Fireboxes
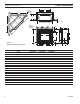
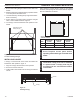
When nishing a custom cabinet, mantel, or other built-in
enclosure, the opening size to accommodate the replace
with trim installed is as follows:
Figure 10 -
Custom Cabinet
A
B
FP2694
custom cabinet
A 37M\," 41M\," 47M\,"
B 35M\," 35M\," 35M\,"
A canopy is furnished with each rebox and MUST be
installed for safe operation. Figure 11
1. Align the canopy with the holes in the top frame.
. Secure the screws as shown.
3. Tighten side screws. Make sure the canopy is level and
secure.
Figure 11 -
Installing Canopy
FP2451
install canopy
Screws
Canopy
FP451
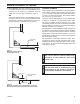
1. Bend out the nailing anges located on each side of the
rebox.
. Slide the rebox into prepared framing or position rebox
in its nal position and frame later.
3. Level the rebox by checking the top edge of the rebox.
Shim if necessary.
4. Anchor rebox to the side framing members using 8d
nails or other suitable fasteners. Figure 9.
5. The canopy must be installed for safe operation of the
heater.
FP2902
nailing flanges
Nail Sides Through
Nailing Flanges
FP90
Figure 9 -
Location of Nailing Flanges