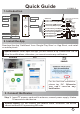
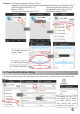
Quick Guide V150803-2 1. Introduction IR LED light Tamper switch LENs Reset Speaker Thread hole Door phone power supply(DC12V 500mA) Antenna Power in DC+(12V)(Red) Power in DC-(12V)(Black) Lock Lock Relay COM(Yellow) Lock Relay NO(Purple) Doorbell Power supply Doorbell Relay COM(Gray) Doorbell Relay NO(White) Net RJ45( Orange&White) Net RJ45( Orange) Net RJ45( Green&White) Net RJ45( Green) CDS Sensor Ring Button Microphone Lock Power supply Doorbell 1 2 3 6 4 5 7 8 2.
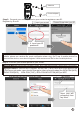
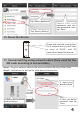
Antenna Power adaptar Step 2: Connect your mobile phone to your router to register a user ID. Register by E-mail: 1. Input your e-mail Please Remember your ID 2. Input your ID password Special Notice: If 2 mobile phones use the same account ID to login at the same time, only 1 mobile phone can receive the push notification alarm ring. So if use 2 mobile phones to connect the device, user should register 2 different account IDs for the 2 mobile phones. Step 3: Connect your mobile phone to your router.
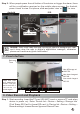
Device will have 'Di.Di.Di.Di....' sound noticing user to scan Wifi QR code. Special Notice: If device have no 'Di.Di.Di.Di....' sound means the device has scanned before. User should press the reset button for 5 seconds until hear ‘KING’ and scan after hearing the 'Di.Di.Di.Di....' notice sound. Aim the device at your smart phone’s QR code in 10-15cm distance (iPad and tablet are 20cm). Once hear the sound ‘DING’, click ‘Heard’, it shows ‘Setting Success’, device is connected to the Wi-Fi.
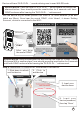
! NOTICE: NOTICE: If fail to scan the QR code, you could reset the device and retry. Or connect wifi by using network cable. More details please refer to PART9 & PART10. 4. Add device to another mobile phones. Scan QR code to set Wifi can be scanned only once. If user need to add device to other mobile phones, user don’t need to scan Wifi QR code again. User should press the button in the ‘device list’ to enter ‘Add Devices’ interface, press ‘Manual’ button and input device ID and password to add device.
Remark: Time zone example: China UTC+8 Germany/France/Spain/Poland/Italy/Netherlands/Norway/Sweden UTC+1 UK/Portugal/Ireland UTC+0 Turkey/Romania/Finland UTC+2 Mexico UTC-6 Colombia/Ecuador/Peru UTC-5 Venezuela/Chile/Manaus UTC-4 Agentina/Uruguay UTC-3 2. Check time is right or not 1. Set Time Zone 3. Click to confirm 6. Push Notification Ring In order to receive the push notification from the device, you should turn on ‘Alarm Push’.
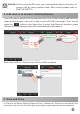
Step 2: When people press the call button of the device or trigger the alarm, there will be a notification received on the mobile phone screen. For Android, press ‘check’ to view. For iphone, slide and press ‘view’ or to view. Android iOS Slide to view ! NOTICE: NOTICE: User must keep the app running at phone's background, user can't force stop the app in phone's application manager, otherwise phone can't receive any push notification. 7.
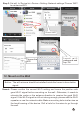
1.Choose ‘Alarm Recording’ to record when visitor press ring button or sensors triggered. 2.Choose the recording time. Step 2: Playback. In ‘Device list→Device→Playback', chose the video file to view playback. 9. Modify device’s password ‘Device List→ Setting→ Security Settings’, choose ‘Admin password’ to modify device’s password.
Tap ‘Admin password’ Input the old password and the new password, then tap ‘Save’. Tap ‘Secrity Setting’ 10. Reset the device Press and hold the reset button for 5 seconds and you will hear a voice of ‘KING’, wait 30 seconds to restart the device. 11. Connect wifi by using network cable (Only used for the QR code scanning is not available) Step 1: Plug in a network cable to the device and the LAN plug of the router. Step 2: Add device. In ‘device list’ slide down to find device. 2 1 1.
Step 3: Set wifi. In ‘Device list→Device→Setting→Network settings’ Choose ‘WIFI’ to set device WIFI. Choose ‘WIFI’ Choose the WIFI Input wifi password and tap ‘Ok’ 12. Mount on the Wall Notice: The wifi antenna should be installed inside the house to have better signal. Remark: Please confirm the correct Wi-Fi setting and insure the position with good Wi-Fi signal before mounting on the wall. Otherwise, it needs to relocate the router or the antenna direction to receive the good Wi-Fi signal.
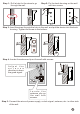
Step 1: Drill a hole for the wires to go through the wall Step 2: Fix the back housing on the wall with two screws Step 3: Lead the wires through the hole in the wall, and put the device into the back housing. Tighten the screw in the bottom. Step 4: Locate the antenna clip on the wall with screws. Adjust the a n t e n n a direction to have the good signal Locate the antenna clip on the wall with screws. Step 5: Connect the wires of power supply, unlock signal, antenna, etc. in other side of the wall.
Antenna Power in DC+(12V)(Red) Power in DC-(12V)(Black) Lock Relay COM(Yellow) Lock Relay NO(Purple) Door phone power supply (DC12V 500mA) Lock Doorbell Power supply Doorbell Relay COM(Gray) Doorbell Relay NO(White) Net RJ45( Orange&White) Net RJ45( Orange) Net RJ45( Green&White) Net RJ45( Green) Lock Power supply Doorbell 1 2 3 6 4 5 7 8 13. Tamper Alarm When the thief open the device, it will have siren alarm, and your phone will receive alarm too. ( The tamper alarm will be last for 1 min.
signal is not good enough and percentage is only 25% or 50%. If 3G network percent is below 75%, it is not good enough to transfer video file, user should change to other place for better mobile 3G signal or change to use WIFI signal. Moreover, 1 device can send push notification ring to max. 5 mobile phones at the same time, user should set more mobile phones to receive the push notification ring to avoid this 3G signal not good at some places problem. Q4.