
Instruction manual


11
2. Power On
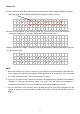
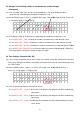
2.1 After confirming all the above adjustments and control wiring is done. Switch the power on and the
LCD will be displayed the following information (including the software version)::
B
X
B
1
.
7
0
V
e
r
s
i
o
n
C
o
n
f
e
r
e
n
c
e
P
A
S
y
s
t
e
m
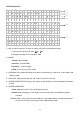
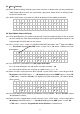
2.2 Later, the system will be in connection test mode, the system will start scanning all connected
conference microphones; LCD will be displayed the following information:
M
e
m
o
r
y
C
h
e
c
k
·
·
·
·
·
·
O
K
2.3 When connection test mode is completed, LCD will be displayed the following information and turn to
the preset menu page.
1
N
O
:
2
M
O
D
E
:
N
o
r
m
a
l
3
O
P
E
N
-
M
I
C
:
0
2
M
i
c
4
A
U
T
O
-
O
F
F
:
3
0
S
e
c
NOTE:
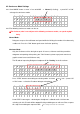
1. When main control unit is ON, this conference system will be executed microphone connection test.
At this moment, the red LED of microphone will be constantly on; 5 seconds later, if the connection
was wrong, it will be flashing. It means the connection is failure.
2. In this case, the power of main control unit should be switched off and check whether the microphone
connection is correct or not and then switch it on again. If the red LED of the microphone is
constantly on for more than 5 seconds, and the connection of the microphone is normal.
3. Press the talk button of the chairman unit or any delegate unit, the red LED of microphone can be
cleared, or wait for 30 seconds until the test mode of the system is finished, and then the conference
begins.