
Datasheet
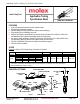


Hand Crimp Tool For 3.96MM (.156”) Pitch KK Crimp Terminals
Doc No: 6382803HM Release Date: 02-27-18 UNCONTROLLED COPY Page 3 of 7
Revision: A Revision Date: 02-27-18
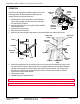
WIRE
PUNCH
TERMINAL
WIRE STOP
BLADE
Figure 3
Figure 4
WIRE
INSULATION
PUNCH
WIRE STOP
BLADE
CONDUCTOR
PUNCH
LOCATOR
TERMINAL
INSULATION
ANVIL
CONDUCTOR
ANVIL
OPERATION
Open the tool by squeezing the handles together. At the end of
the closing stroke, the ratchet mechanism will release the
handles, and the hand tool will spring open.
1. With the hand tool in the open position, pivot the terminal
locator open by pulling up on the locator knob, and lift the
wire stop blade. See Figure 2.
2. Insert the terminal into the correct profile until the terminal is
fully seated and stops.
3. Gently pivot the locator closed.
4. Bring down the wire stop blade.
5. Make sure the wire stop blade is fully seated on the terminal behind the conductor grip section.
6. Slide the pre-stripped wire into the terminal; make sure to aim the wire brush toward the tip point on the
wire stop blade. See Figure 3. Align the wire so that it is parallel and sitting into the terminal. Maintain a
light and constant pressure on the wire that is seated in the terminal at all times. (Do not let go of the
wire.) Be sure to hold the wire and terminal in place until the terminal is fully crimped. See Figure 4.
7. Close the tool until the ratchet releases.
8. Lift the wire stop blade.
9. Carefully remove the crimped terminal.
Note: To maintain good brush control and a consistent bell mouth, the crimping instructions must be followed.
Note: The tamper-proof ratchet action will not release the tool until it has been fully closed.
TERMINAL
SEATED IN
LOCATOR
SWING
LOCATOR
OPEN
Figure 2
HAND TOOL
OPEN
WIRE
STOP
BLADE