
User Manual


Quality Crimp Handbook
Order No: ATS-638000029 Release Date: 09-04-03 UNCONTROLLED COPY Page 11 of 23
Revision: C Revision Date: 09-12-06
Disconnect power and remove
necessary guards
Install tooling into
the press
Load terminals
into tooling
Manually cycle
the press
Evaluate tooling to
ensure it is clean and
not worn
Replace
tooling / clean
Set shut height
of the press
Remove tooling
from the press
Start
Complete
cycle?
Tooling
aligned?
Terminal feed OK?
Terminal centered
over anvil?
Evaluate cut-off tab
and
bell mouth
Install safety guarding
and connect power
Crimp
samples
B
Adjust terminal feed
and/or feed finger
Align
tooling
A
Adjust track
position
Manually cycle
the press
Disconnect power and
remove necessary guarding
Crimp
samples
Adjust press
position
Evaluate
conductor
brush
Disconnect power and
remove necessary guards
Adjust
wire stop
Loosen insulation
crimp
A
Bench press
or wire
processing
B
Evaluate
insulation
position
Crimp
samples
Adjust
strip length
Install safety guarding and
connect power
Adjust conductor
crimp height
Adjust
insulation
Trouble shooting
(See Section 9)
Disconnect power and
remove necessary guarding
Conductor
crimp height
OK?
Pull
Force test
Crimp
samples
Insulation
OK?
Conductor
crimp
OK?
Install safety guarding and
connect power
Adjust conductor
crimp height
Disconnect power and
remove necessary guarding
Disconnect power and
remove necessary guarding
Adjust insulation
crimp height
Install safety guarding and
connect power
End
Wire
p
rocessin
Bench
p
ress
No
No
Yes
Yes
Yes
No
No
Yes
Good
Not
Good
No
No
Yes
Good
Not
P
ass
Yes
Pass
Good
Not
Good
Not
Good
No
Yes
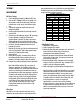
PROCEDURES FLOW CHART