
Datasheet
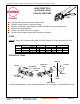


Hand Crimp Tool for 2.50mm (.098”) Pitch Wire-to-Wire Splash Proof Crimp Terminal
Doc No. ATS-638118600 Release Date: 07-16-07
UNCONTROLLED COPY Page 4 of 7
Revision: A Revision Date: 07-16-07
Figure 11
PUSH ON
HANDLE
JAWS OPEN
PULL OPEN
TOOLING
TOOLING
M3 BHCS
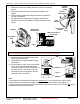
Locator Replacement
See the parts list on the last page of this document
for the proper locator order number. Follow the
steps below to replace the locator.
1. Open the crimp hand tool.
2. Squeeze gently on the lower area shown in
Figure 7A with your thumb and index finger.
The lower tabs of the locator should disengage
from the hand tool.
3. Lift and pull away from the hand tool. The top
locator hooks should slip out of the top slots
easily. See Figure 7A.
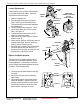
4. To reinstall the new locator, make sure the
hand tool is in the open position.
5. Press the red insert down as far as it will go as
shown in Figure 7B.
6. Holding onto the lower part of the locator with your
thumb and index finger, insert the locators top
hooks (2) into the hand tool top slots.
7. Rotate the locator down and press the lower tabs
into the two bottom slots of the hand tool. To
secure the locator into place, the lower tabs must
snap into place on the hand tool frame.
Right or Left Hand Operation
This hand tool has an added feature that can be
converted from a right handed application to a left
handed application. It is necessary to reverse the
tooling if using the left handed application along with
the locator. Follow the steps below:
1. The locator must be removed before reversing
the tooling.
2. Remove the M3 BHCS which is holding the
upper tooling.
3. Flip the upper tooling to the opposite side and
replace the M3 BHCS. Make sure the small
markings on the front and back of the hand tool
frame match up and are on the outside of the
hand tool frame. See Figure 11 and 12.
SQUEEZE
HERE
LOCATOR
Figure 7A
SQUEEZE
HERE
TOP HOOKS
TOP SLOTS OF
HANDTOOL
LOWER TABS
MAKE SURE
CENTER OF LOCATOR
IS IN THE
DOWN POSITION
Figure 7B
MATCH
UP MARKS
FRONT BACK
Figure 12