
Datasheet
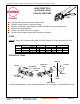


Hand Crimp Tool for 2.50mm (.098”) Pitch Wire-to-Wire Splash Proof Crimp Terminal
Doc No. ATS-638118600 Release Date: 07-16-07
UNCONTROLLED COPY Page 3 of 7
Revision: A Revision Date: 07-16-07
WIRE
Figure 5
TERMINAL
WIRE AGAINST
THE WIRE STOP
WIRE STOP IS PART OF
THE LOCATOR
PRE-STRIPPED
WIRE
TERMINAL
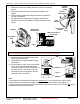
4. Release the locator button, allowing the locator to return to the crimping
position.
5. Close the tool handle until the first ratchet position engages. See
Figure 4.
6. Insert the properly stripped wire through the terminal and against the
wire stop. See Figure 5.
7. Crimp the terminal by squeezing the tool handles until the ratchet
mechanism cycle has been completed. Release the handles to open
the jaws.
Note: The tamper proof ratchet action will not release the tool until it has been fully closed.
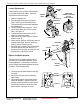
8. Remove the crimped terminal from the terminal
locator by pulling on the wire.
9. Visually inspect the crimped terminal for proper
crimp location.
10. On some large O.D. wires, it may not be possible
to insert the wire with the tool partially closed.
Those wires should be inserted with the hand tool
in the open position. Insert the wire above the
terminal in the punch and against the wire stop
then close the tool. See Figure 6.
Note:
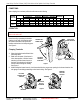
A crimp height chart is provided with this manual as Reference Only.
Due to the wide range of wires, strands,
insulation diameters, and durometers available, actual crimp height measurements may very slightly. An
occasional, destructive, pull force test should be performed to check hand tool crimp. Pull Force value Must exceed
the Minimum pull force specifications listed.
TERMINAL
Figure 6
WIRE
WIRE STOP
PARTIALLY
CLOSE HANDLE
TOOLING
PARTIALLY
CLOSED
Figure 4
FIRST RATCHET
POSITION
OPEN
POSITION