
Datasheet
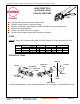


Hand Crimp Tool for 2.50mm (.098”) Pitch Wire-to-Wire Splash Proof Crimp Terminal
Doc No. ATS-638118600 Release Date: 07-16-07
UNCONTROLLED COPY Page 2 of 7
Revision: A Revision Date: 07-16-07
RELEASE
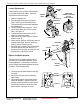
LOCATOR
BUTTON
TERMINAL
Figure 3
LOCATOR
PUSHED THRU
TOOLING
TERMINAL
LOCATOR
BUTTON
PUSHED IN
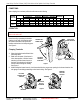
CONDITIONS:
After crimping, the conductor profiles should measure the following.
Conductor Crimp Insulation Crimp
Wire Size
Height (Ref.) Width (Ref.) Height (Ref.) Width (Ref.)
Pull Force
Minimum
Profile
Terminal
Series No
AWG mm
2
mm In. mm In. mm In. mm In. N Lb. 20 (0.5) 22 (0.3)
20 0.50 0.85-0.95 .033-.037 1.53 .060 1.69 .067 1.80 .071 58.9 13.23 X
50147
22 0.30 0.85-0.95 .033-.037 1.47 .058 1.65 .065 1.77 .070 39.2 8.82 X
20 0.50 0.85-0.95 .033-.037 1.53 .060 1.69 .067 1.80 .071 58.9 13.23 X
50148
22 0.30 0.85-0.95 .033-.037 1.47 .058 1.65 .065 1.77 .070 39.2 8.82 X
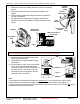
OPERATION
CAUTION: Install only Molex terminals listed above with this tool. Do not crimp hardened objects as damage can
occur to the tool or die.
Open the tool by squeezing the handles
together. At the end of the closing stroke,
the ratchet mechanism will release the
handles and the hand tool will spring open.
See Figure 1.
Crimping Terminals
1. Select the desired terminal listed in the
preceding charts.
2. Make sure the center of the locator is
in the down position. With the locator
attached, push the locator button on
the back of the hand tool to bring the
locator forward through the tooling.
See Figure 2.
3. While holding the locator button in, load the terminal into the proper nest opening in the locator based on the
wire gauge or terminal type markings on the hand tooling. See Figure 3.
SQUEEZE
HANDLES
TOGETHER
HANDLE WILL
SPRING OPEN
Figure 1
LOCATOR IN
DOWN POSTION
PUSH ON THE
LOCATOR BUTTON
Figure 2