
User Manual Part 2

Locations Tab
SpectraGuard® Enterprise User Guide
120
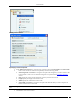
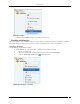
Specifying a Path to attach an Image
3. On the Select image file to attach to attach to this location dialog, browse to the appropriate image and
then click <Open>.
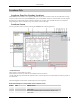
Zooming In/Zooming Out, Opacity Control, Resolution of an Image
Considerable screen area is required to display a large sized layout (for example, 3000 x 2000 sq. ft.) defined or
imported in the system. The zooming in/zooming out feature makes it easier to comprehend the RF coverage and
device placement information. It also avoids excessive scrolling.
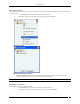
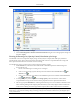
Use the following steps to zoom in/zoom out of an image and control its opacity.
1. In the Location tree, select the location node that has a .SPM file imported or attached image and
devices placed on it.
2. Do one of the following for zooming out or zooming in:
Select a zoom percentage (%) from the drop-down list and then click the Zoom out icon or
Zoom in icon .
Enter a zoom % between 1% to 1000% in the editable drop-down box and then click the Zoom out
icon or Zoom in icon .
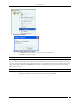
3. To change the opacity of the image, select an Image Opacity value. Decrease this value to better
comprehend RF coverage or increase this value to pinpoint exact device placement information.
4. Select an appropriate Resolution for rendering of the heat maps. A lower resolution would mean much
faster rendering although with a higher pixelization effect (coarser look). High resolution would mean
much slower rendering due to the large number of pixel cells for which values need to be calculated.
Note: The system proportionately resizes the RF layout display area depending on the zoom % specified by the user. Additionally,
attached image, if any, and scale markings change accordingly. The system also readjusts scrollbars to keep the displayed objects
center point invariant.