
User Manual Part 2


Devices Tab
SpectraGuard® Enterprise User Guide
68
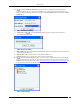
Remove from Quarantine: Available only if the Client is manually Quarantined this option
enables you to stop quarantine on the Client, thereby enabling wireless communication.
Enable Auto-quarantine: Enabled by default, this option ensures that the system automatically
quarantines a Client, thereby honoring the specified Intrusion Prevention policy.
Disable Auto-quarantine: This option ensures that the system does not automatically quarantine
a Client (regardless of the policies).
Reset RF Fingerprint: Resets the data transmitted by the Client.
Add to Banned List: Enables you to add the selected Client to the Banned List to prevent the
Client from engaging in wireless communication.
Remove from Banned List: Available only if the Client is already in the Banned List, this option
enables you to remove the selected Client from the Banned List.
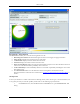
Start Troubleshooting: Opens the Troubleshoot tab of the Client Device dialog, which allows
you to start a troubleshooting session in either Packet Level Mode or Event Level Mode. Click
<Start Troubleshooting> to start troubleshooting.
Stop Troubleshooting: Available only if a troubleshooting session is in progress, this option
enables you manually terminate the session.
Delete: Enables you to delete a selected Client.
Change Location: Opens the Location Tag dialog that enables you to view the complete list of
locations, and change the location of the selected Client (see Manual Location Tagging).
Smart Device: Allows you to change the device type or untag the smart device to a regular device.
Move to…: Enables you to categorize a Client in your network by moving it to the Authorized,
External, Guest, or Rogue folder. If you move a Client manually, the system never re-classifies that
Client automatically based on the Client classification policy. To enable automatic re-classification, you
must delete that Client and let the system re-discover it.
Fetch SAFE Report: Available only if a SAFE Client is Active, this option displays a progress bar and
then fetches a fresh report from the SAFE Client.
Change SAFE Group: Enables you to change the SAFE Client group for the selected SAFE Client.
Note: The menu items Fetch SAFE Report and Change SAFE Group are visible only if a SAFE Client connects to the system
at least once. However, if the SAFE Client goes down, Fetch SAFE Report is disabled and Change SAFE Group is enabled. The
Client’s group changes when it next connects to the system.
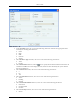
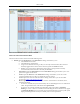
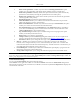
Client Details Dialog
You can open the Client Details dialog in the following manner:
On the Devices screen, right-click a Client row and select the Details menu item. The Client Details dialog has the
following tabs: Properties, Events, Performance, Troubleshoot, and Locate. By default the Properties tab displays and
is treated as the current tab.