
User's Manual


InstallingȱtheȱSensorȱ
SpectraGuard
®
ȱEnterpriseȱInstallationȱGuideȱ
28ȱ
ȱ
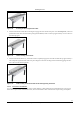
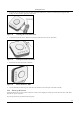
Figure 46. Flat Surface Installation
Recommended:ȱAirTightȱdoesȱnotȱrecommendȱwallȱmountingȱofȱtheȱSensorȱasȱitȱusesȱomniȱdirectionalȱantennas.ȱ
5.2.2 MountȱtheȱSSȬ300ȬATȱSensorȱ
TakeȱaȱconfiguredȱSensor,ȱthatȱis,ȱmakeȱsureȱthatȱtheȱSensorȱisȱgivenȱaȱstaticȱIPȱorȱtheȱsettingsȱhaveȱbeenȱchangedȱforȱDHCP.ȱ
NoteȱtheȱMACȱaddressȱandȱtheȱIPȱaddressȱofȱtheȱSensorȱinȱaȱsafeȱplaceȱbeforeȱitȱisȱinstalledȱinȱaȱhardȬtoȬreachȱlocation.ȱTheȱ
MAC
ȱaddressȱofȱtheȱSensorȱisȱprintedȱonȱaȱlabelȱatȱtheȱbottomȱofȱtheȱproduct.ȱ
Recommended:ȱYouȱshouldȱlabelȱtheȱSensorsȱusingȱMACȱaddressesȱorȱatȱleastȱyourȱownȱconvention.ȱForȱexample,ȱuseȱserialȱnumbers,ȱsoȱ
thatȱyouȱcanȱeasilyȱidentifyȱtheȱSensors.ȱ
5.2.2.1 Ceiling/WallȱMountingȱ
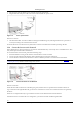
ToȱinstallȱtheȱSensorȱonȱaȱwallȱorȱceiling,ȱuseȱtheȱmountingȱbracketȱthatȱcomesȱwithȱtheȱdevice.ȱFollowȱtheseȱsteps:ȱ
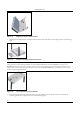
1. ȱFollowingȱtheseȱguidelines,ȱscrewȱtheȱmountingȱbracketȱtoȱaȱwallȱorȱceiling:ȱ
x Theȱmountingȱbracketȱtabsȱshouldȱbeȱpointingȱupward.ȱ
x Ifȱmountingȱtoȱdrywall,ȱuseȱtheȱ4ȱscrews
ȱandȱ4ȱwallȱanchors.ȱ
x IfȱmountingȱtoȱanȱEUȱelectricalȱboxȱ(60.3mm),ȱuseȱ2ȱthreadedȱscrewsȱandȱinsertȱintoȱtheȱholesȱmarkedȱ“A ” ȱinȱtheȱ
diagramȱshownȱbelow.ȱ
x IfȱmountingȱtoȱaȱUSȱelectricalȱboxȱ(83.3mm),ȱuseȱ2ȱthreadedȱscrewsȱandȱinsertȱintoȱtheȱholesȱmarkedȱ“B”ȱinȱtheȱ
diagramȱshownȱbelow.ȱ
ȱ
Figure 47. Holes for inserting screws
2. ConnectȱtheȱEthernetȱcableȱ(forȱpowerȱandȱnetworkȱconnection)ȱtoȱtheȱLANȱportȱonȱtheȱbackȱofȱtheȱSensor.ȱ
3. ToȱmountȱtheȱSensorȱontoȱtheȱmountingȱbracket,ȱinsertȱtheȱmountingȬbracketȱtabsȱintoȱtheȱslotsȱonȱtheȱbackȱofȱtheȱAP.ȱ
IMPORTANT:ȱIfȱyouȱareȱmountingȱtheȱSensorȱonȱaȱwall,
ȱyouȱcannotȱuseȱtheȱslotsȱonȱtheȱbottomȱnarrowȱedgeȱofȱtheȱdevice.ȱInstead,ȱtheȱ
slotsȱonȱtheȱbackȱofȱtheȱSensorȱmustȱbeȱused.ȱ
5.2.2.2 FlatȱSurfaceȱInstallationȱ
ToȱinstallȱtheȱSensorȱonȱaȱflatȱsurfaceȱsuchȱasȱaȱtableȱorȱdesktop,ȱfollowȱtheseȱsteps:ȱ