
User's Guide


AirTight Management Console Configuration
65
7.
Specify Blackout Time, in minutes. This is the time for which a user is not allowed to login after his
previous successful session was timed out.
For example, if the session time-out is 1 hour and the blackout time is 30 mins, a user will be timed
out one hour after a successful login. Now after this point, the user will not be able to login again for
30 minutes. At the end of 30 minutes, the user can login again.
8.
Specify the Redirect URL. The browser is redirected to this URL after the user clicks the submit
button on the portal page.
If left empty, the browser is redirected to the original URL accessed from the browser for which the
portal page was displayed.
9.
Specify the value of the Service Identifier that you have defined in Advanced Parameters. This is a
free form parameter that can be passed to the external portal.
This parameter can be used by the external portal to implement SSID profile specific functionality. For
example, each SSID can have a separate portal page.
10.
Click Save to save the settings.
Disable Captive Portal
Deselect the Enable Captive Portal check box to disable captive portal settings.
Firewall Settings
A firewall controls the incoming and outgoing network traffic, based on a set of defined rules. Click
Firewall on the Add SSID Profile page to configure firewall settings for the SSID profile. You can add,
modify, reorder, and delete firewall rules from the Firewall section.
The firewall rules defined for the SSID profile are evaluated in a top down manner. That is,the first rule is
evaluated first, followed by the next rule, and so on, till a match is found for the respective host name and
direction.
When you create a SSID profile, you will notice that the default rule has been set to block all incoming
and outgoing requests from any host or domain. Define the default rule by selecting Allow or Block to
allow or block any type of requests from IP addresses, host names, subdomain names or domain names
for which no specific firewall rules have been defined.
To enable firewall for the SSID profile, select the Enable Firewall check box. If it has been previously
selected and you want to disable firewall for the SSID profile, deselect the Enable Firewall check box.
Add New Firewall Rule
Do the following to add a firewall rule.
1.
Click Add New Rule.
2. If one or more rules have already been defined, select Above the selected rule or Below the
selected rule to insert the new rule above or below the selected rule, depending on how you want to
prioritize the rules.
3.
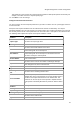
Enter the rule details as specified in the following table.
Field Description
Rule
Name
name of the rule
Host
domain name, sub domain name, host name, subnet or IP address to
which the rule applies.
You can provide a comma-separated list of more than one host names