
User's Guide


AirTight Management Console User Guide
176
A troubleshooting session automatically times out or terminates after the specified timeout irrespective of
the activity. Refer to the 'Stop Troubleshooting' sub-section in this section to manually terminate a
troubleshooting session.
If you are an AirTight Cloud Services user, you can upload the packet capture file directly into WizShark.
You can then use WizShark to analyze the packet capture or trace files. Following are the prerequisites to
successfully upload the file to WizShark.
You must have subscribed to the WizShark service.
You must have upload privileges in WizShark.
The file size must not exceed the maximum file size prescribed by WizShark.
When the file is uploaded, the total storage quota for your account must not be exceeded.
Troubleshoot AirTight Device using Wireshark on Local Machine
To troubleshoot an AirTight device, do the following.
1.
Click Devices.
2. Select the AirTight Devices tab.
3. Select the check box for the AirTight device to troubleshoot.
4.
Click the More>Packet Capture option on the tool bar.
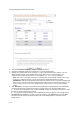
5. Select the Live Packet Capture option under Troubleshooting Mode. The Troubleshoot AP dialog
box appears.
6.
Select Streaming option as Wireshark on local machine.
7. Specify the time-out interval in Timeout. The default time-out for packet level troubleshooting mode is
5 minutes. Minimum allowed value is 1 minute and maximum is 720 minutes for the time-out.
8.
Select the packet type. If you want to capture all packets, select the All option. If you want to capture
only specific packet types, select the filter option and then select the required data frames and/or
management frames to capture while troubleshooting.
9.
In the Protocol and Channel Selection section, select the protocols and channel for which you want
to troubleshoot. If you want to select a single channel, select the Select Channel option and specify
the channel number and Width (channel offset). By default, the protocol and channels are displayed
based on the device template applied to the troubleshooting sensor. You can select a different
protocol and/or channel, if required. Alternatively, you can select the Rotate on all Channels option,
to troubleshoot on all available channels.
10.
Click Start Troubleshooting to start the troubleshooting. The sensor is enabled to capture live
packets.
11.
Select an appropriate tool for live packet capture. If you don't have the tools already installed, you
can download Wireshark or any other tool.
12.
To view the packet capture, open the command line interface of the operating system installed on
your computer and execute the command shown under Wireshark depending on the tool you use.
The Troubleshooting in Packet Level Mode dialog box gives a guideline to the command to
execute for Wireshark.
Troubleshoot AirTight Device to upload Packet History to AirTight server
To troubleshoot an AirTight device, do the following.
1.
Click Devices.
2. Select the AirTight Devices tab.
3. Select the check box for the AirTight device to troubleshoot.
4. Click the More>Packet Capture option on the tool bar.
5. Select the Live Packet Capture option under Troubleshooting Mode. The Troubleshoot AP dialog
box appears.
6.
Select Upload to Server as Streaming option.