
Installation Guide


Please contact Technical Services at 888-387-9881 with any questions. 0213_2021 | EH | 03/2021 | 4 of 12
• When joining the next plank (#7) to the third plank in the second row (#6), join the short side edges rst. There will be a gap on the long side joints when the
plank is rotated down.
• Raise the outside long edge of the plank upward approximately 1”. This will raise the outside long edge of planks in that row. Maintain this angle as you
push the plank in until the long edge of the plank meets the long edge of the rst row. Rotate downward on the plank until the joint locks. Tap the long
side or short side joints closed, if necessary, by using a tapping block or pull bar.
• After each row is complete ensure, there is gap no less than 3/8” (10mm) around the perimeter.
• Repeat these steps to complete the installation.
NOTE: Check oor squareness and straightness regularly.
Diagram 1
Wall
• To install the nal row of planks/tiles, you will usually need to cut them. We recommend the following: lay a plank face up on top of the last row installed
with the tongue and groove facing the same way as the eld of the installation (This will represent your nal row to be trimmed). Place another plank against the
edge of the wall and on top of the nal row. Mark the plank underneath. Cut the plank and install the last row leaving ample expansion space.
NOTE: In place of a resilient tile cutter, a miter or circular saw (with the blade cutting into the design of the plank) can be used to cut the rigid luxury vinyl
ooring. A utility knife can also be used, scoring the top of the pattern and snapping the plank. It will be necessary to cut the foam underlayment after
snapping the plank.
NOTE: Maintain a 3/8” (.95 cm) expansion space around all walls and vertical objects. Quarter round or baseboard molding will cover this
expansion space.
NOTE: Maintain the 3/8-inch space around cabinets, pipes, toilet anges and any obstacle in the oor (It is not recommended to trim around a toilet,
however leave the expansion space around the toilet ange)
Additional Instructions/Notes
Multi-Width Plank Installation
• To install the multi-width product, install a row of the 7” wide plank alternating between the 5” and 9” plank sizes. Install a 5” row, then 7” row, then 9” row,
and then 7” row again, and then repeat this pattern.
Molding and Transitions
• All oor molding and transition strips need to provide a 3/8-inch (10mm) expansion space to allow expansion and contraction.
• Ensure moldings and transitions strips will not pinch the ooring. This will prevent the oor from properly expanding and contracting as well as allowing
the structure to move freely over the oor.
• For rooms that have a run greater than 50 feet, a transition strip must be installed.
• Never allow nails or screws to enter the rigid luxury vinyl ooring or the expansion zone around the ooring perimeter as it will prevent proper expansion
and contraction of the structure and ooring.
• Quarter round, base board, door jambs etc. should never pinch the ooring. This will prevent the oor from properly expanding and contracting as well as
allowing the structure to move freely over the oor.
Plank Replacement
Should one of your planks/tiles become damaged and need to be replaced, follow these simple instructions:
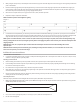
1. Mark the top of damaged plank/tile with a marker or pencil. Make two triangle cuts near the end joint and then connect the points with one long cut in the
middle of the plank/tile. (See diagram below)
SCORE TILE AS SHOWN
2. The use of a chisel to tap through the plank (on scored triangle cut points) works well to complete the cut.
3. Lift and remove damaged tile.