
Installation Guide


Please contact Technical Services at 888-387-9881 with any questions. 0213_2021 | EH | 03/2021 | 3 of 12
• Ceramic tile and embossed ooring exceeding the above requirements will require skim coating with a Portland cement-based patch to avoid bottom up
pattern telegraphing.
• Remove any existing oor molding. Removal of wall baseboards is optional providing quarter round is installed to cover the required expansion gap.
• Undercut doorjambs allowing the rigid luxury vinyl ooring to slip under doorjamb/case molding.
• Sweep the suboor clean. The oor must also be free of all contaminates.
Job Site Conditions
• It is recommended that resilient oor covering installation shall not begin until all other trades are completed.
• Areas to receive ooring shall be clean, fully enclosed, with the permanent HVAC set at a uniform temperature range of 55ºF(13ºC) and 85ºF(29ºC) and
maintained following the installation.
• Adhesive working and open times vary based on job conditions, substrate, temperature and humidity.
Temperature – Ambient
• Controlled environments are critical for testing and installation. Fully operational HVAC systems are the best way to ensure temperature and
humidity control.
• Do not install resilient ooring products until the work are can be temperature controlled. Minimum installation temperature is 55ºF (13ºC) with a
maximum installation temperature of 85ºF(29ºC) and humidity below 65% for 48-hours prior to, during and after pre-installation testing.
NOTE: Do not install ooring if suboor moisture test results exceed recommended limits.
Temperature – Radiant Heat
• Radiant heated substrates must never exceed 85ºF(29ºC) surface temperature.
• Several days prior to installing resilient products over newly constructed radiant heated systems, make sure the radiant system has been on and operating
at maximum temperature to reduce residual moisture within the concrete.
• Three days prior to installation, lower the temperature to 65ºF(18ºC), and 24-hours after installation, gradually increase the temperature in increments of 5ºF.
• After continuous operation of the radiant system, ensure the surface of the oor does not exceed 85ºF(29ºC).
Installation Instructions
Inspection of ooring material prior to installation is required. Any defects should be immediately reported to the retail store from which the ooring was
purchased before installation. Mohawk will not be responsible for labor costs to repair or replace material with defects that were apparent before or noticed at
the end of an installation.
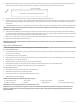
NOTE: Your starter rows will consist of your rst and second row to provide additional stability. See Diagram 1 for examples of the instructions below.
NOTE: Do not install cabinets on top of vinyl ooring.
• The rst plank (#1) of the rst row should be a full-length plank. Trim off the proles facing the wall and position the cut edges adjacent to the wall making
sure that you leave an expansion gap of 3/8 inch (9 mm) between the plank and wall, using spacers as needed. The entire installation requires a 3/8”
expansion space.
NOTE: Cutting tiles and planks may be cut with a small resilient tile cutter or scored with a utility knife and snapped.
• The rst plank (#2) of the second row should not exceed 50% of the length of the plank.
• Align the rst plank (#2) of the second row with the rst plank (#1) of the rst row at an angle and engage the long side joint by folding down until joints
lock. The factory end should face in from the perimeter of the installation. Cut edges always face away from the eld of the installation. To properly seal the
joint, if necessary use a small scrap of plank/tile to gently tap along the entire length of the plank/tile. Lock the scrap piece-groove to tongue or tongue to
groove-to the plank/tile requiring tightening and gently tap the edge of the scrap with a tapping block. This will bring the tile edges tight together.
• Align the second plank (#3) of the rst row against the end joint of plank (#1) of the rst row at a slight angle and fold down until joints lock.
• When joining the next plank (#4) to the rst plank in the second row (#2), join the short side edges rst. There will be a gap on the long side joints when the
plank is rotated down.
• Raise the outside long edge of the plank upward approximately 1”. This will raise the outside long edge of planks in that row. Maintain this angle as you
push the plank in until the long edge of the plank meets the long edge of the rst row. Rotate downward on the plank until the joint locks. Tap the long
side or short side joints closed, if necessary, by using a tapping block or pull bar.
• Align the third plank (#5) of the rst row against the end joint of plank (#3) of the rst row at a slight angle and fold down until joints lock.
• When joining the next plank (#6) to the second plank in the second row (#4), join the short side edges rst. There will be a gap on the long side joints when
the plank is rotated down.
• Raise the outside long edge of the plank upward approximately 1”. This will raise the outside long edge of planks in that row. Maintain this angle as you
push the plank in until the long edge of the plank meets the long edge of the rst row. Rotate downward on the plank until the joint locks. Tap the long
side or short side joints closed, if necessary, by using a tapping block or pull bar.