
Installation Instructions


21
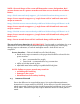
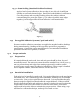
NOTE: Size and shape of the room will determine corner designation. Red
arrows denote use of a power stretcher and blue arrows denote use of a knee
kicker.
Step 1: Hook onto tack strip approx. 3 ft. in both directions along corner A.
Step 2: Power stretch at approx. 15° angle from wall AC and hook onto tack
strips at corner B.
Step 3: Hook & secure onto tack strip with knee kicker along wall from A to B.
Step 4: Power stretch at approx. 15° angle from wall AB and hook onto tack
strip at corner C.
Step 5: Hook & secure onto tack strip with knee kicker along wall from A to C.
Step 6: Power stretch at approx. 15° angle from wall AB and hook along wall
from C to D.
Step 7: Power stretch from wall AC and hook along wall from B to D.
The use of a Power Stretcher is MANDATORY. Devices used as a substitute for, or an
attachment to such devices that penetrate through the carpet backing may cause injury,
damage carpet or substrates, or result in inadequate stretch. Such devices are not
acceptable.
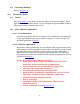
Power Stretcher – This tool should have all of the following:
Based on the carpet construction, the proper head should be selected for the
power stretcher:
pins – recommended for cut pile
cotton head – recommended for loop construction
Ability to lock the stretch in place.
Adjustable metal tubes ending in a padded tail block/plate.
NOTE: Failure to power stretch may result in:
wrinkling and buckling
damage to the carpet
delamination of secondary backing
11.5 Amount of Stretch
Due to the difference in carpet backing types, it is required that manufacturer
instructions for carpet stretch be followed. In the absence of specific instructions,
tufted carpet with synthetic backing should be stretched a minimum of 1% in length
and in width. Patterned carpet may require additional stretch to obtain pattern
match.