
Assembly Instructions

Rev010813 2
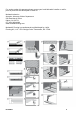
face up when you use a handsaw, table saw or a crosscut saw.
10 FOCUS POINTS
1. Thanks to the Uniclic® system, the floor floats and is installed without glue. You can
walk on the floor during and immediately after installation.
2. With Uniclic® planks you can choose where you want to begin. Think about what will
be the easiest way to install the floor. We will demonstrate the installation for right-
handed people, from left to right. You can work in the other direction if you want.
3. Install from 2 or 3 cartons at a time to make sure the planks are mixed sufficiently when
you install them, so that you do not end up with too many identical, light or dark planks
next to each other.
4. Check all planks in daylight before and during installation. Defective planks must never
be used.
5. The floor should preferably be installed parallel to how the light enters the room. The
ideal conditions are 15-20°C (59-68°F) at a relative humidity of 50-60%.
6. Under normal conditions*, Mohawk® flooring requires no acclimation period. Outside
of the normal conditions, let the planks acclimate for 48 hours in the unopened
packaging at the normal room temperature in the middle of the room where the floor is to
be installed. *Normal conditions means a difference of no more than 25°F and 20%
relative humidity between the stocking/transportation environment of the flooring and the
final installation environment of the flooring.
7. Room humidity can vary according to the season, so it is vital that the floor is able to
expand and contract. For this reason, make sure you leave an expansion joint of minimum
8 to 10 mm (5/16” to 3/8”) on all sides of the floor, around pipes, thresholds, under doors
and around any fixed/stationary objects (floor vents, kitchen islands, etc.).
8. Large rooms must have expansion joints every 13 m (40 feet) width-wise to the planks
and every 13 m (40 feet) length-wise. It is recommended to provide an expansion joint
between different rooms (e.g. under the door). Expansion joints can be finished by means
of a molding that is attached to the subfloor.
9. Ensure that the end joints of the planks in two successive rows are never in line.
Always ensure that the joints are staggered by at least 15 cm / 6 inches.
10. We recommend you purchase a few extra cartons of flooring. This will be useful to you
if you have some damaged pieces, miscalculate the size of the room, or make a cutting
error. This also will help you if your floor needs a repair but your product is no longer
manufactured.
PREPARING THE ROOM
• If 7mm product, allow the laminate flooring to acclimate for 48 hours in its sealed
packaging in the middle of the room where it is to be installed. Mix planks from different
cartons when installing to maximize the natural look of the floor.
• Check that the doors can still open and close after the floor has been installed
(Minimum + 1 cm or 3/8”).
• Check whether the old molding can be removed or reused. You can also leave the
wall base and finish the floor with Mohawk® profiles.
• Make sure the subfloor is flat. Any unevenness greater than 2 mm (1/16”) over the
length of 1 meter (40”) must be smoothed out or filled in. It is vital that you use
underlayment to smooth any unevenness in the base floor. The specially designed
Mohawk® underlayments have a damp proof, insulating, noise reducing, and leveling
function.
• Make sure the subfloor is clean, flat, dry and stable.
•Flooring may be installed over radiant heat systems, following special
installation instructions. Contact your retailer or visit our website at
www.mohawkflooring.com for further details.