
Installation Instructions


1.10.1Trim Completes the Job
Trim Completes The Job
Wall base and Mohawk quarter round molding give a finished appearance to your laminate installation.
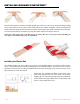
Mohawk offers quarter round, stair nose and the revolutionary new InstaForm™ multipurpose profile,
which are available in coordinating colors to match the Mohawk Laminate floor. InstaForm™ includes
a reducer, universal edge, and t-molding— all in one piece. You simply use the included cutting/sanding
tool to remove portions not needed for the particular profile, and then sand the edges to achieve the perfect
profile. (A plastic multi-functional rail is also included with the InstaForm profile to enable easy installa
-
tion in a variety of situations.)
These moldings cover the 3/4-inch expansion space around the perimeter of the room or wherever the
laminate flooring meets vertical surfaces. Existing molding can be reused, or your customer may choose
new moldings to match other woodwork.
INSTALLING TRIM
Before you can install wall base or quarter round molding, you’ll need to remove the spacers that you placed
throughout the expansion areas. Be sure that you’ve applied a 100% silicone sealant in all expansion areas
recommended—base cabinets with sinks, dishwashers, bathrooms and laundry
rooms (all perimeter expansion spaces), and around the toilet flange.
Cutting Trim
Use a hand or electric miter box coping or saber saw with a sharp, clean carbide
blade to cut the moldings to the desired sizes.
Attaching Trim
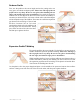
First, never fasten wall base or quarter round molding (right,top) directly
to your Mohawk Laminate floor. Fasten the trim only to the wall so that the
laminate planks can expand and contract without resistance. You can use a
hammer or an air gun to attach the molding directly to the wall. Be sure to attach to solid surfaces (framing
studs are normally found every 16 inches), instead of to the sheetrock alone.
When nailing by hand, first drill pilot holes to ensure that you do not
crack the molding. Counter sink the fasteners just below the surface
of the molding. Coordinating putty covers the nail heads. If you wish,
you can use trim screws. First drill pilot holes, then install the screw,
countersink, and fill with putty.
You can also use construction adhesive in caulk gun tubes to attach
the molding, but be careful not to get any of this glue on the laminate.
Be very careful in applying this glue so that you don’t compromise the
floor’s ability to expand or contract. If you inadvertently get adhesive
on the floor, use a small amount of acetone or mineral spirits to clean
the residue.
Mohawk Overlap Stairnose Molding