
Installation Instructions
This will be useful to you if you have some damaged pieces, miscalculate the size of the room, or miss cut some
pieces. This also will help you if your floor needs a repair but your product is no longer manufactured.
PREPARING THE ROOM
• If 7mm product, allow the laminate flooring to acclimate for 48 hours in its sealed packaging in the middle of the
room where it is to be installed. Mix planks from different cartons when installing to maximize the natural look of
the floor. • Check that the doors can still open and close after the floor has been installed
• (minimum + 1 cm (3/8”))
• Check whether the old molding can be removed. You can also leave the wall base and finish the floor with
Mohawk® profiles.
• Make sure the subfloor is flat. Any unevenness greater than 2 mm (1/16”) over the length of 1 meter (40”) must
be smoothed out. It is vital that you use underlayment to smooth any unevenness in the base floor. The
specially designed Mohawk® underlayment has a damp proof, insulating, noise reducing, and leveling function.
• Make sure the subfloor is clean, dry and stable.
• Flooring may be installed over radiant heat systems following special installation instructions. Contact your
retailer or visit our website www.mohawkflooring.com for further details.
CONCRETE SUBFLOOR:
New Construction:
• A new concrete floor must dry at least 1 week per 1 cm (3/8”) thickness up to 4 cm (1-1/2”). Thicknesses over 4
cm (1-1/2”) require twice as much drying time. For example, a 6 cm (2-1/2”) concrete subfloor must dry for at
least 8 weeks. The moisture content must be less than 2.5% (CM method) or less than 5 lbs/24 hour per
1000sqft (Calcium chloride method ASTM 1869).
Renovation:
• Remove any damp-porous floor covering (carpet, needle felt, etc.) first.
• Damp-sealed floor covering (PVC, linoleum, VCT, etc.) does not have to be removed. Always use underlayment
and damp-proof membrane.
WOODEN SUBFLOOR
• Remove any existing damp-porous floor covering first.
• Make sure the sub floor is stable. Nail down any loose parts and apply a leveling layer if necessary.
• Install the Uniclic® planks crosswise to the direction of the existing subfloor. • It is necessary that the crawl
space under the plank floor is sufficiently ventilated. Remove any obstacles and provide sufficient ventilation
(minimum 4 cm (1-1/2”) of total ventilation holes per meter (40”) of floor). The moisture content of the wood may
not exceed 12%.
INSTALLING THE FLOOR
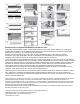
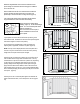
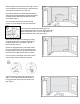
• First install the underlayment, per width and gradually as you progress. If the underlayment is pre-mounted on
the planks, then only use a damp-proof moisture barrier with water resistant adhesive tape. For Concrete, let the
membrane run up the wall a bit before cutting to size. For wood, cut the moisture barrier 1 inch from the wall. A
molding will be attached to this later. See diagram 3A.
• Begin the first row with a whole plank. First, saw off the tongue on both the long and the short sides. See
diagram 3B.
• Put the plank with sawn off sides against the walls. Put spacers from the installation kit between the planks and
the wall. This will ensure that your expansion joint is wide enough: 8 to 10 mm (5/16” to 3/8”). See diagram 3C. •
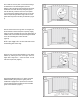
The diagrams indicate where the Uniclic® planks are clicked together by angling up and down or where they are
tapped together flat. Follow the diagrams precisely. See diagrams 4.1- 4.16
• In places where it is too difficult to install the Uniclic® planks with the tapping block (e.g. against the wall), you
can tap them together using the pull bar and a hammer. See diagrams 5A-5B-5C.
• There must also be an 8 to 10 mm (5/16” to 3/8”) expansion joint between the last row and the wall. Keep this in
mind when sawing the last row of planks.
INSTALLATION IN WET AREAS
Since prolonged water exposure could damage your laminate flooring, the following installation recommendations
should be closely followed to validate your residential water warranty. Wet areas would include, but not limited to,
bathrooms, powder rooms, kitchens, mud rooms, foyers, and laundry rooms. Neither Mohawk® flooring planks nor
Mohawk® accessories are recommended for extreme humid applications such as in saunas or swimming pool areas.
The water warranty excludes all products thinner than 8mm and does not apply to beveled edge products when used in
bathrooms. An expansion area of 8 to 10mm (5/16” - 3/8) must be provided around all vertical obstructions including
walls, permanent cabinets, pipes, etc. All perimeter expansion areas must be completely filled in with a water repellent
flexible silicone sealant. When applying sealant, it is helpful to first apply a strip of masking tape parallel to and