
Installation Instructions
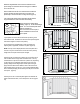
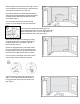


Adhere the plank to the wall leaving a 3/16" gap
(A)
from the
corners of the wall and a 1" gap
(B)
at bottom. Drive brad nails ½"
from the top and bottom of each plank to secure to wall. Place nails
where the trim will cover.
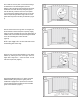
Continue with the installation for each subsequent plank by
first applying silicone adhesive to the back side of the plank
in an “S” pattern. Then angle the groove over the tongue of
the previous plank and wiggle into place. Tighten joints as
needed with a tapping block or pull bar. Finally, d
rive brad
nails ½" from the top and bottom of each plank to secure to wall.
Place nails where the trim will cover.
Be sure to drive the brad nails
into a stud whenever possible.
(Figure 4)
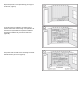
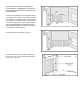
Finish wainscot accent to ending wall. (Figure 5)
Install trim (chair rail) over the top edge. Install quarter
round in the corners. Finish by installing the baseboard
of your choice. (Figure 6)
Trim (chair rail)