
Installation Guide

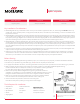


Installation Instructions
RigidTec
™
Vinyl Planks
This document is reviewed on an ongoing basis.
MOHK19015 9/197
RigidTec Click Lock Installation Instructions (continued)
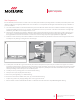
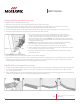
4. Use a tapping block and soft faced hammer to close any gaps between the planks.
5. Once you reach the end of the rst row, measure and cut the nal plank so that it completes the row while also leaving the necessary ¼"
expansion gap. Last planks of rows must be at least 8" long. Note: Use a spare plank to create a straight edge at the cut line. Use a utility
knife to score the top of the pattern and snap the panel. It will be necessary to cut the foam underlayment after snapping the panel.
6. Start the second row of ooring by using the trimmed planks from the previous row. First pieces must be at least 8" long. End joints should
be staggered a minimum of 6" from one row to the next.
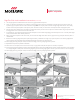
7. At a slight angle, insert the long edge tongue of the rst plank in row 2 into the long edge groove of the plank in row 1 until the plank edges
meet, and then rotate down until the joints lock.
8. When joining the next plank in the second row, join the short side edges rst. There will be a gap on the long side joints when the plank is
rotated down.
9. Raise the outside long edge of the plank upward approximately 1". Maintain this angle as you push the plank in until the long edge of the
plank meets the long edge of the rst row. Rotate downward on the plank until the joint locks.
10. After tapping the long side joint closed, close the short edge joints using a tapping block or pull bar.
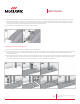
11. Repeat these steps to complete the installation.
12. After each row is complete, ensure there will be a ¼" (6 mm) gap to the wall, after the joints are closed, for expansion.
13. For the last row, align the plank to be used on top of the 2nd to last row. Using a full width plank as a spacer, trace the wall contour. Use a full plank
as a straight edge to cut the plank. Insert the long edge tongue into the long edge groove and use a pull bar and hammer to close the gap.
14. After tapping the long side joint closed, close the short edge joints using a tapping block or pull bar.
0372ES | 04/2019 | Page 6/8MOHAWK TECHNICAL SERVICES DEPARTMENT | 508 EAST MORRIS STREET, DALTON, GA. 30721 | 888.387.9881
Solidtech Plus Installation Instructions
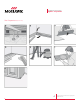
4. Use a tapping block and soft faced hammer to close any gaps between the planks.
5. Once you reach the end of the rst row, measure and cut the nal plank so that it completes the row while also leaving the necessary ¼” expansion
gap. Last planks of rows must be at least 8” long. Note: Use a spare plank to create a straight edge at the cut line. Use a utility knife to score the top
of the pattern and snap the panel. It will be necessary to cut the foam underlayment after snapping the panel.
6. Start the second row of ooring by using the trimmed planks from the previous row. First pieces must be at least 8” long. End joints should be
staggered a minimum of 6” from one row to the next.
7. At a slight angle, insert the long edge tongue of the rst plank in row 2 into the long edge groove of the plank in row 1 until the plank edges meet,
and then rotate down until the joints lock.
8. When joining the next plank in the second row, join the short side edges rst. There will be a gap on the long side joints when the plank is
rotated down.
9. Raise the outside long edge of the plank upward approximately 1”. Maintain this angle as you push the plank in until the long edge of the plank
meets the long edge of the rst row. Rotate downward on the plank until the joint locks.
After tapping the long side joint closed, close the short edge joints using a tapping block or pull bar.
Repeat these steps to complete the installation.
After each row is complete, ensure there will be a ¼” (6 mm) gap to the wall, after the joints are closed, for expansion.
For the last row, align the plank to be used on top of the 2nd to last row. Using a full width plank as a spacer, trace the wall contour. Use a full plank
as a straight edge to cut the plank. Insert the long edge tongue in to the long edge groove and use a pull bar and hammer to close the gap.
After tapping the long side joint closed, close the short edge joints using a tapping block or pull bar.
Solidtech Plus Click Lock Installation Instructions Continued
10.
11.
12.
13.
14.