
Installation Guide


Installation Instructions
RigidTec
™
Vinyl Planks
This document is reviewed on an ongoing basis.
MOHK19015 9/196
Mohawk RigidTec Installation Instructions
• RigidTec ooring is intended for indoor use only.
• Temperatures within the room must be maintained between 0°F to 140°F (-18°C to 60°C).
• Extreme ranges between 0°F to 50°F (-18°C to 10°C) and 100°F to 140°F (37°C to 60°C) apply to unoccupied environments only.
Occupied areas as well as the installation need to be controlled between 50°F to 100°F (10°C to 37°C).
• A ¼" (6 mm) expansion space must be maintained around the perimeter of the room and any xed objects such as pipes or columns.
• Use approved safety equipment to provide proper protection based on each given task.
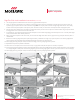
• Door-jambs and casings must be undercut so that the plank can slide underneath.
A ¼" (6 mm) expansion space must also be included around the undercut jambs and
casings. A reciprocating saw is recommended to create the necessary undercut.
Never undercut metal door casings. Cutting Tip: To undercut the casing, lay a scrap piece
of ooring next to the casing and lay the saw at on top of the ooring so that the saw easily
cuts to the height of the plank.
• Important: Always inspect each plank to ensure it is not damaged prior to installation.
Check the tongue and groove to ensure both are free of debris or damage.
• It is recommended to blend ooring from multiple cartons during installation.
• Cartons should be evenly stacked no more than ve cartons high on a at surface and away
from any heating or cooling ducts or direct sunlight.
• Excess ooring should be stored in a protected and climate controlled environment for
possible future repairs.
• The HVAC system must be on and functional before, during and after installation.
• Power tools can be dangerous. Operate in strict accordance with manufacturer’s operating instructions and safety precautions. Unsafe and
improper use can cause serious injuries. Avoid inhalation and exposure to airborne particles by wearing personal protective equipment,
including: NIOSH or OSHA approved dust masks, safety goggles, and work gloves.
RigidTec Click Lock Installation Instructions
1. Inspect each plank. Blend planks from several cartons at the same time to ensure good color and shade mixture throughout the installation.
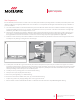
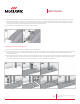
2. It is recommended that installation begin in a corner of the room. Between the rst row of ooring and the wall, insert spacers so that
a ¼" (6 mm) gap is maintained.
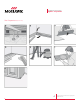
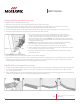
3. When installing the rst row, insert the short edge of one plank into the short edge of another plank at a slight angle and rotate downward.
Continue to complete the starter row, maintaining a straight edge for the following row.
0372ES | 04/2019 | Page 5/8MOHAWK TECHNICAL SERVICES DEPARTMENT | 508 EAST MORRIS STREET, DALTON, GA. 30721 | 888.387.9881
Solidtech Plus Installation Instructions
• SolidTech Plus ooring is intended for indoor use only.
• Temperatures within the room must be maintained between 0°F to 140°F (-18°C to 60°C).
• Extreme ranges between 0°F to 50°F (-18°C to 10°C) and 100°F to 140°F (37°C to 60°C) apply to unoccupied environments only. Occupied areas
as well as the installation need to be controlled between 50°F to 100°F (10°C to 37°C).
• A 1/4” (6 mm) expansion space must be maintained around the perimeter of the room and any xed objects such as pipes or columns.
• Use approved safety equipment to provide proper protection based on each given task.
Door-jambs and casings must be undercut so that the plank can slide underneath. A 1/4” (6 mm)
expansion space must also be included around the undercut jambs and casings. A reciprocating
saw is recommended to create the necessary undercut. Never undercut metal door casings. Cut-
ting Tip: To undercut the casting, lay a scrap piece of ooring next to the casting and lay the saw
at on top of the ooring so that the saw easily cuts to the height of the plank.
Important: Always inspect each plank to ensure it is not damaged prior to installation. Check the
tongue and groove to ensure both are free of
debris or damage.
It is recommended to blend ooring from multiple cartons during installation.
Cartons should be evenly stacked no more than ve cartons high on a at surface and away from
any heating or cooling ducts or direct sunlight.
Excess ooring should be stored in a protected and climate controlled environment for possible
future repairs.
• The HVAC system must be on and functional before, during and after installation.
• Power tools can be dangerous. Operate in strict accordance with manufacturer’s operating instructions and safety precautions. Unsafe and im-
proper use can cause serious injuries. Avoid inhalation and exposure to airborne particles by wearing personal protective equipment, including:
NIOSH or OSHA approved dust masks, safety goggles, and work gloves.
1. Inspect each plank. Blend planks from several cartons at the same time to ensure good color and shade mixture throughout the installation.
2. It is recommended that installation begin in a corner of the room. Between the rst row of ooring and the wall, insert spacers so that
a ¼” (6 mm) gap is maintained.
3. When installing the rst row, insert the short edge of one plank into the short edge of another plank at slight angle and rotate downward.
Continue to complete the starter row, maintaining a straight edge for the following row.
Mohawk Solidtech Plus Installation Instructions
Solidtech Plus Click Lock Installation Instructions