Installation Instructions RigidTec Vinyl Planks ™
Solidtech Plus Installation Instructions PRODUCT DESCRIPTION GRADE LEVELS Rigid Vinyl Plank Above, On and Below INSTALLATION METHOD Installation Instructions ™ RigidTec Vinyl Planks Click Lock Key Installation Considerations • Mohawk SolidTech Plus flooring is intended for interior use only and is suitable for applications above, on, and below grade.
Installation InstructionsInstructions Solidtech Plus Installation ™ RigidTec Vinyl Planks Site Preparations Prior to installation, the homeowner or installer must ensure that job site conditions (including subfloor or substrate, ambient temperature and relative humidity) will not negatively affect the floor. The manufacturer is not responsible for damages associated with improper installation or Site Preparations poor site conditions.
Installation Instructions RigidTec™ Vinyl Planks Solidtech Plus Installation Instructions Site Preparations Continued Site Preparations (continued) 4 MOHAWK TECHNICAL SERVICES DEPARTMENT | 508 EAST MORRIS STREET, DALTON, GA. 30721 | 888.387.9881 This document is reviewed on an ongoing basis.
Installation Instructions RigidTec™ Vinyl Planks Approved Subfloors Concrete, plywood, OSB, particleboard, chipboard, hardwood (solid, engineered, parquet), tile (ceramic, terrazzo, stone, asbestos, peel and stick), non-cushion sheet vinyl, metal, VCT, and DRIcore are acceptable substrates. All subfloor requirements noted below must be met prior to the installation of Mohawk RigidTec flooring.
Installation Instructions Solidtech Plus Installation Instructions RigidTec™ Vinyl Planks Mohawk Solidtech Plus Installation Instructions Solidtech Plus Installation Instructions Mohawk Solidtech Plus Installation Instructions • SolidTech Plus flooring is intended for indoor use only. Mohawk RigidTec Installation Instructions •• Temperatures theisroom mustfor beindoor maintained between 0°F to 140°F (-18°C to 60°C). SolidTech Pluswithin flooring intended use only.
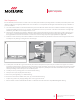
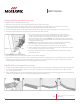
Installation Instructions Solidtech Plus Installation Instructions RigidTec™ Vinyl Planks Solidtech Plus Click Lock Installation Instructions Continued 4. Use a tapping block and soft faced hammer to close any gaps between the planks. RigidTec Click Lock Installation Instructions (continued) 4. 5. 5. Once you reach the end of the first row, measure and cut the final plank so that it completes the row while also leaving the necessary ¼” expansion gap.aLast planks of rows be at least 8” long.
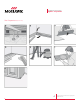
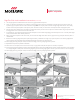
9. 10. 10. 11. 11. 12. 12. 13. 13. 14. 14. Installation Instructions RigidTec™ Vinyl Planks Solidtech Plus Installation Instructions Solidtech Plus Installation Instructions 15. When the new flooring meets a threshold or a doorway, we recommend undercutting the door jamb. To secure the right cut, turn a plank upside 15. down When and the new or aframe. doorway, recommend undercutting door jamb.
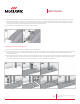
8. 9. 10. 11. 12. 13. 14. 15. 16. 17. 18. Installation Instructions RigidTec™ Vinyl Planks Solidtech Plus Installation Instructions 19. 20. Remove all spacers. 20. Remove all spacers. 21. Fill any expansion spaces around potentially wet areas, such as refrigerators, tubs, etc., with premium waterproof 100% silicone caulk. 21. Fill any expansion spaces around potentially wet areas, such as refrigerators, tubs, etc., with premium waterproof 100% silicone caulk. 22.